
Documentation
iPhemeris Astrology Software for Mac
Mac Documentation
What's New
Check here for the latest new features, enhancements and bug fixes.
Make sure you have automatic software updates turned on in App Store -> Settings to never miss an iPhemeris update.
If you are not seeing an update you think you should, check that your macOS has been updated to a version equal to or later than what the current iPhemeris update requires.
Version 5.x
We have switched the business model to a purchase of base features with an "All Access" subscription that enables Premium features. No previously purchased feature, either in the base product or an In-App purchase, will ever be taken away. Apple App store policy requires developers to continue to make previously purchased features available for as long as the product they were purchased in is in the App store.
If you don't see something you purchased, don't panic! It is still there somewhere. Check this documentation and especially the What's New section. If you can't find it, contact support.
This change will be good for everyone going forward. It enables us to continue to fix bugs and maintain the software and provide continual improvements to the base product. And, more importantly to add many more premium features.
We felt we had to make this change to be able to increase the pace of innovation and improvement; to continue to add new features and also to keep up with the many changes Apple is making with Glass UI in the 26.x macOS and iOS operating systems. Apple is constantly re-arranging the deck chairs and which require continual maintenance simply to stay functional. If iPhemeris does not keep up, it will quickly become non-functional or incompatible with newer Apple platforms.
Software subscriptions are the trend in the software industry and we are moving with it. We hope you will understand and stay with us because there are many very good things to come.
Version 5.2
Version 5.2 is focussed primarly on improving AI Advisor Question and Answer mode. We added some buttons to facilitate providing the AI with data about additional charts during a conversation and which don't require it to give a highly formatted response.
You will find these new buttons very helpful for
Version 5.1.1
Version 5.1.1 adds a Major new feature: iPhemeris AI Advisor!
AI Advisor delivers comprehensive, professional-level chart interpretations with a psychological and spiritual perspective. Engage interactively to explore natal charts, current transits, and synastry. Refine timing techniques, deepen your understanding of astrology, and gain clear, growth-oriented insights.
-
New - iPhemeris AI Advisor provides AI driven analysis of:
- Chart Placements & Aspects.
- Sysnastry between charts.
- Ask questions about the analysis or placements or aspects.
- Ask astrological question about specific placements or transits.
- All conversations are saved to iCloud with your charts and can be resumed at a later time.
-
Fixed - Unselected Points on Reports. There were some points that were not selected appearing on various reports, this has been fixed and will not happen anymore.
-
Fixed - Display Issues in Chart List. Fixes a display issue when searching and filtering the chart list.
NOTE: AI Advisor requires your own OpenAI or ChatGPT account and associated API key. You will be billed by OpenAI for your usage. See the setion on Preferences explaining how to add an API Key for Open AI.
Version 5.0.1
iPhemeris version 5.0.1 requires macOS 15.6 or newer.
As always, we strongly recommend you do not get too far behind the macOS update cycle. iPhemeris generally avoids requiring the latest, bleeding edger version of macOS, but we do expect people to stay reasonably current.
New, Improved & Fixed
-
NEW - 800+ Fixed Stars can be shown on the wheel and in reports. The user interface is similar to the Planet & Point selector panel and is easy to use. Requires an All Access subscription.
-
NEW - Show Uranians settings. A new setting on the first panel of the iPhemeris Settings menu that toggles ON/OFF the display of Uranians in Planet & Points list.
-
NEW - More Languages. iPhemeris is now translated into 6 additional languages: Greek, Indonesian, Polish, Portuguese, Thai, Vietnamese. If you see a bad translation, please contact support with a correction.
-
IMPROVED: Orb Settings have been improved:
- It is now possible to turn ON/OFF display of any aspect on a Chart or Report without changing orbs.
- Applying (-) and Separating (+) orbs can be independently set for:
- Luminaries (Sun/Moon)
- Planets
- Fixed Stars
- To accommodate language translation and problems with abbreviations we now use - and + next to the Orb editor, rather than A and S.
- We use - for applying orbs which are behind or less than the exact aspect.
- We use + for separating orbs which are past or more degrees than the exact aspect.
-
FIXED: There were some minor issues with points being displayed in the wrong house for: Equal MC and Campunus house systems.
Note: Fixed stars took a long time and was a lot of work because many things in the underlying data models needed to be changed to accommodate the many additional points that can now be shown on charts and reports. The pace of improvement and innovation will be quicker going forward. Enjoy!
Introduction
iPhemeris® © 2026 for macOS and iOS is wholly owned, developed and operated by Clifford Ribaudo and iPhemeris LLC.
About
iPhemeris uses the Swiss Ephemeris which is based on the Jet Propulsion Laboratories (JPL) DE431 Ephemerides and the US Naval Observatory equivalent for Asteroids. It offers sub-second accuracy to within .001 seconds of arc.
The ephemeris included with the purchase of iPhemeris covers 1700 AD to 2995 AD. The Extended Ephemeris, included with an All Access subscription increases coverage to 7700 years (4700 BC to 2995 AD). The date range applies to all iPhemeris features.
iPhemeris uses New Style Gregorian Calendar dates starting October 15, 1582 and Julian dates or Old Style for earlier dates. However, be aware that various countries adopted the Gregorian calendar at other times; for example, Great Britain didn't switch until September 1752. Therefore, adjust your dates accordingly.
When using the Extended Ephemeris, enter new style dates after Oct. 15, 1582 and old style dates prior. Currently iPhemeris does not support proleptic Gregorian dates for dates prior to 1582.
Note: We use translation services, but Astrology is a special discipline and many astrological terms have dual meanings. If you notice anything out of context or incorrect in your language please notify support.*
Support
iPhemeris Support is very responsive to email. We typically respond within hours and will do our utmost to help.
Before contacting support, please make a thorough review of the documentation. Check the:
- Settings sections.
- Sections on Preference.
- FAQ Frequently Asked Questions
Many basic questions are already answered in these places.
If you do in fact find a bug ... relatively rare and usually not something obvious like an incorrect ascendant ... then we may ask your help to diagnose it. We might ask for a crash report or if you wish to be a tester of a software fix. Your assistance in these matters is always appreciated.
Getting Support
Email us using the iPhemeris Help menu in the menu bar at the top of the Mac screen: Help → Email iPhemeris Support. Sending email via that button includes information in the email (iPhemeris and macOS versions) that helps us to diagnose problems.
When asking questions about charts:
- Send a screen shot of the chart:
- Screens shots should include the information in the upper left of the chart.
- Don't allow Apple mail (or whatever you use) to downsize the image to small.
- If your question is about difference between an iPhemeris chart and a chart obtained via other means, include a screen shot of the other chart also. Questions like: "Why is my iPhemeris chart different from the chart I got before, or from x?", without the other chart, don't provide any context and we have no way of knowing what you are looking at or what setting might be different.
- If you are getting a chart with an unfamiliar Ascendant, please review the documentation on time zones. Wrong time zones are the most frequent cause of issues with MC & Ascendants.
- When asking about something else:
- Provide a clear description with as much information about the issue as possible.
- Include the version of iPhemers and macOS you are using.
NOTE: Posting negative reviews is not the fastest or best way to get our attention. It can take us weeks to notice and we often have no way to diagnose your problem or the bug if that is in fact what it is.
Frequently Asked Questions
1) The iPhemeris Ascendant is not what I expected, why not?
The most common causes of this are, in this order:
- A different time zone.
- Check that the time zone of your iPhemeris chart matches whatever you are comparing it to.
- iPhemeris uses standard time zone notation; locations West of GMT are - locations East are +.
- A different time. Check if you entered AM instead of PM or vice versa.
- A different house system.
- The chart is displaying Tropical positions when you intended Sidereal.
- A different location.
2) Can't See a Chart or Report the First Time Mac Version Used?
Occasionally, the first time a user runs the Mac version of iPhemeris, the chart or reports view is collapsed.
If after you have selected a Chart in the list:
- You see a Chart but not the Reports, look for the dot in the vertical bar on the right edge of the Chart and drag it to the left.
- You see the Reports, but not the Chart, look for the dot in the vertical bar on the left edge of the Reports and drag it to the right.
Once both Charts and Reports are visible, size them and the iPhemeris application window accordingly.
3) Why does iPhemeris get a different time zone for a location?
Time zones are difficult. There were no global standards adopted until recently. iPhemeris looks them up using a service on the internet.
To ensure iPhemeris can look up the correct time zone, when erecting a chart follow these steps:
- Enter the date.
- Enter time. Do not adjust times for Daylight Savings. Enter them exactly as they appear on the birth certificate.
- Enter location via the map.
- Use the time zone lookup button *after the previous steps. For time zone lookup to work correctly it must have date, time and place.
- Do not use Local Mean Time except for very old dates and places when no time zone standards existed.
If your time zone still does not match what you expected, read the section on Time Zones in this documentation for more details.
you may have to do some research to verify what the correct time zone is. Do not assume the one iPhemeris looked up is wrong. There are many errors in one of the frequently used atlases.
4) I use iCloud, but charts are not syncing to all devices?
iCloud update frequency is not under iPhemeris control, Apple devices decide when to send data to the cloud. Apple typically syncs devices pretty quickly, but several things can affect it:
-
Mobile devices will not sync if you do not allow data over mobile and the device cannot get a WIFI connection.
-
If you run out of iCloud storage space new data will not be uploaded to iCloud. Check that you did not hit a storage limit. If you did, buy more space from Apple or delete something in the cloud.
-
If you are not using the latest (or compatible) versions of iPhemeris on all device, there can be a database compatibility mismatch. The iPhemeris database used by newer versions of iPhemeris can be incompatible with older versions of iPhemeris. iCloud sees the incompatibility and will not sync incompatible database records. The solution is to update iPhemeris on all your devices.
Preferences
Symbols / Calculations
All of these settings are Global and are used throughout the program in every feature.
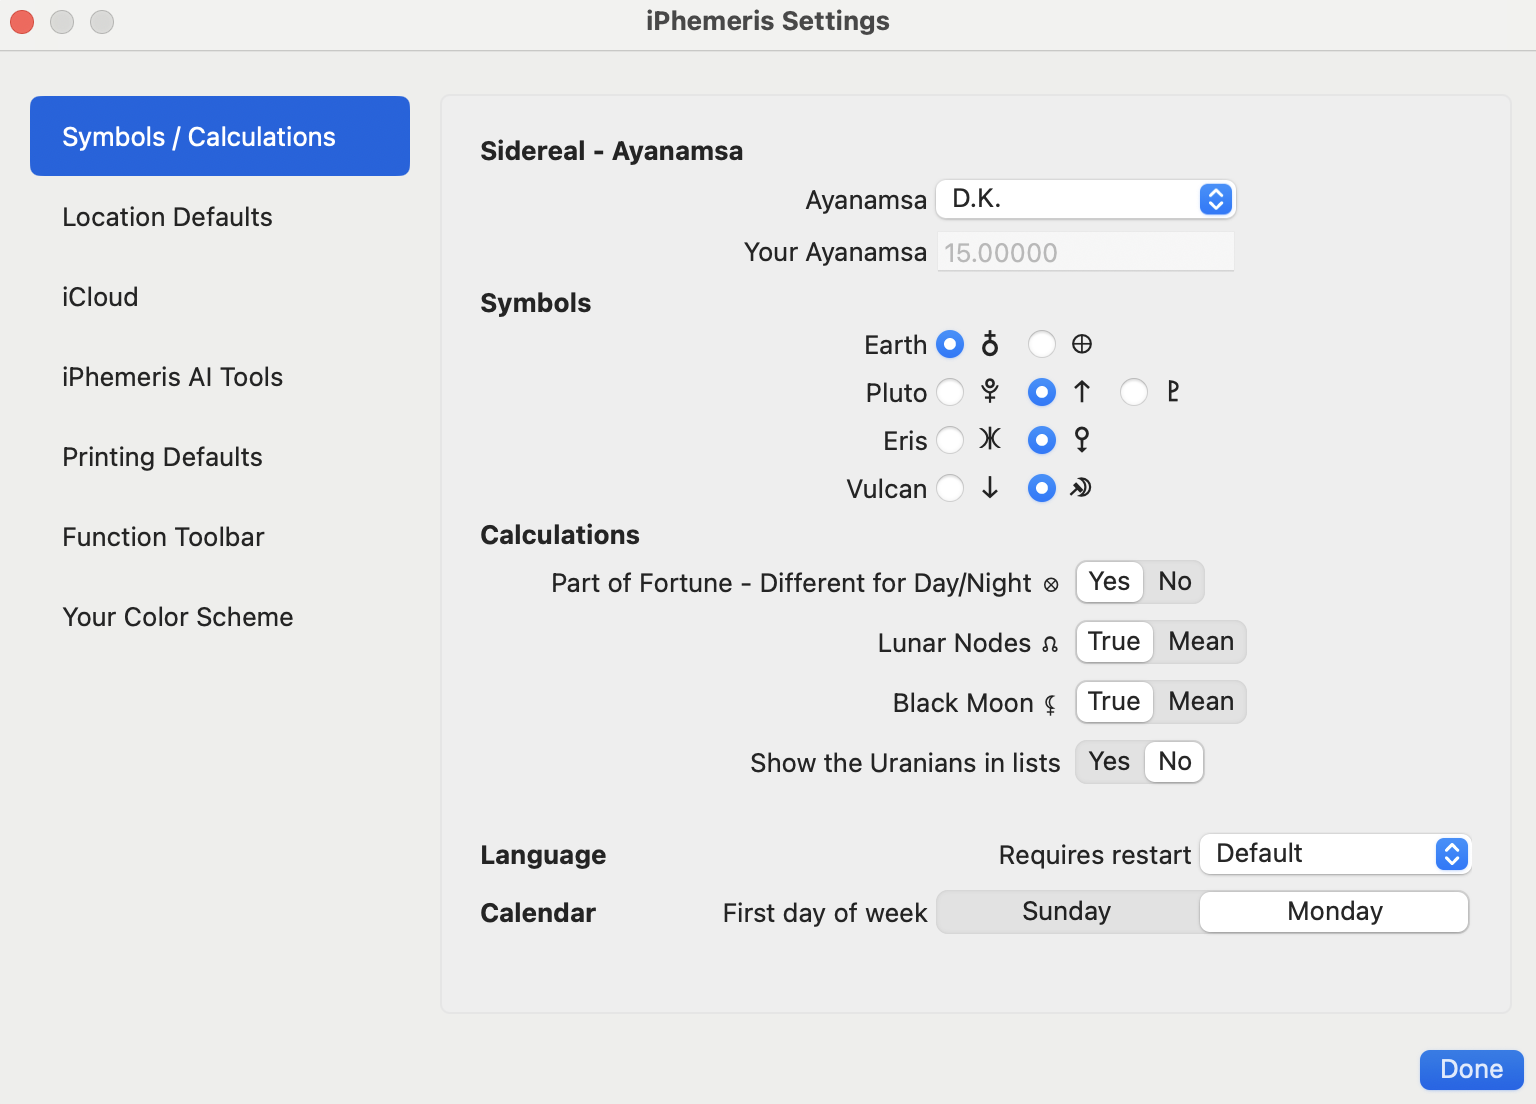
Ayanamsa
When a feature is displaying Sidereal data, this Ayanamsa settings is used to calculate the difference from Tropical. If you use sidereal data then you must also pick one of the pre-defined Ayanamsa, or set a custom value. If you did not select an Ayanamsa, you will see Sidereal Tropical displayed on the chart wheel (this is not correct), and your chart will not be what you expected.
You can either:
- Pick one of the well known pre-defined values from the list.
- Or, set Your Own custom value. To set a custom value, choose Your Ayanamsa at the bottom of the Ayanamsa list and enter a value in the place provided for it. -- Enter a value for the Epoch Jan 1, 2000. iPhemeris will interpolate the correct value for other dates. -- To calculate the correct value, use this formula: ValueNow – ((CurrentYear – 2000) x 0.01396887831940).
Note: The degree offset from tropical positions for pre-defined Ayanamsa are listed at the end of this documentation. Values are for the Epoch starting Jan. 1, 2000. iPhemeris adjusts those to the date of the chart. It does this using the mean rate of annual precession (0.01396887831940° per year).
Symbols
Select the symbol iPhemeris should use to represent: Earth, Pluto, Eris & Vulcan.
Show Uranians in lists, turns ON or OFF the display of the Uranians in the sidebar lists of points shown in charts and reports.
Calculations
Part of Fortune – Most ancient authorities advocated using a different algorithm for day and night births. However, due to a mis-translation of Ptolemy's writings many Astrologers commonly believe he advocated using the same formula for day and night births. Recent translations make it clear he did not. It's your choice, iPhemeris offers both:
- Different for Day and Night Births (default):
- Part of Fortune for Day Birth = Ascendant + Moon – Sun
- Part of Fortune for Night Birth = Ascendant + Sun – Moon
- Same for Day or Night Births: Part of Fortune = Ascendant + Moon – Sun
Lunar Nodes – True or Mean value for lunar nodes. There is a substantial difference so if you see a difference from what you expected this is most likely the cause.
Black Moon – Use either True or Mean values for Lunar Apogee, also known as Black Moon and Lillith.
Languages
Use this setting to force iPhemeris to use one of the supported translations and override your system language settings.
Calendars
Choose Sunday or Monday to display as the first day of the week in the following features:
- Ephemeris and Declination/Latitude
- Aspect Calendar
- Transit Calendar
Location Defaults
Location Preferences are used by the Ephemeris tables and Calendar pages for the location and elevation when Topocentric data is being displayed.
iCloud
When iCloud is enabled (the default), iPhemeris stores horoscope data in iCloud. This enables your Mac & iOS devices to share charts. Charts added or edited on one device will sync to all devices.
iCloud is the only form of backup iPhemeris supports. We strongly recommend using it.
Chart data uses very little iCloud storage space and you will be very glad you did if your on device database somehow gets lost or damaged.
To Enable It:
- Click Yes (if not already ON)
- Follow all prompts.
- If you are asked to sign into iCloud, use the same account you use with iPhemeris on your other devices.
When enabled, charts from other devices using iPhemeris will start to appear after a few minutes. If you do not see them, after 5 minutes or so, restart iPhemeris.
Troubleshooting
Please double check the following:
- Check that iCloud is enabled in iPhemeris Settings.
- If you can't save charts, it might be caused by one of the following:
- The iCloud storage limit was reached. In this case the solution is to delete something like unwanted photos or buy more storage space from Apple.
- iCloud was enabled, check your devices System iCloud Settings.
- If you are not seeing saved data move move between devices and you know iCloud is enabled, check the following:
- Your devices have access to the internet via WIFI or some other means.
- If the connection is going over mobile then you must allow data over mobile or charts will not sync.
Save Displayed Planet & Points In iCloud
Your settings for which Planets & Points are displayed in each feature can be shared with iPhemeris on all your other devices via iCloud.
- Turn ON the setting next to the feature you want to sync to other devices.
- Leave OFF the ones you want to be used only on that device.
This setting can be ON on some devices, and OFF on others. For example, if you want to use the same settings only on your Mac devices, turn it ON on your Macs and leave it OFF on your iPhones.
AI Advisor API Key
iPhemeris AI Advisor is included with an "All Access" subscription. To use this feature, you must get an OpenAI API Key for your OpenAI/ChatGPT account, and add it to iPhemeris.
The API Key is specific to you - and only you - and will enable iPhemeris to use OpenAI on your behalf. OpenAI is the AI Engine that runs ChatGPT. Your usage is specific to your account and you will be billed for your usage by OpenAI, not iPhemeris. iPhemeris LLC does not benefit in any way or get a commission from your usage of OpenAI.
iPhemeris stores the API key securely in your iCloud Keychain so that it is available for your use in iPhemeris on all your other devices (iPhone and Mac). You will only need to add it once.
Getting An OpenAI API Key
To get your API Key follow these steps:
- Browse to OpenAI.com
- Login to API Platform. You will see that option when you hover over or tap the login button.
- If you already have a ChatGPT account, you can use the same username and password to login to OpenAI.com (OpenAI and ChatGPT are the same company).
- If you do not have a ChatGPT account, you can either:
- Create a ChatGPT account if you plan to use that also, and then use that to sign into OpenAI.
- Or, create a new OpenAI account.
- Once logged in, click your name in the upper right corner.
- Select API Keys in the left sidebar.
- Click Create New Secret Key
- Answer the dialog questions like this:
- Owned By - You.
- Name - Anything you want but something you will recognize later e.g. iPhemeris AI.
- Project - Default (unless you already have other projects set up).
- Permissions - All.
- Click the Create Button.
- Important!! Use the Copy button NOW** to get the key because after you click the Done*** button you cannot see the key again and you will have to create another.
- Paste it into the place for it in iPhemeris Preferences on the Mac or iPhemeris Settings on the iPhone or iPad.
- Or, save it someplace so you can add it to iPhemeris later.
- You should use this key only for iPhemeris so that you can track usage.
- Your key will not work until you provide a payment method and buy some credits. Follow the billing steps below.
OpenAI Billing
You must add a payment method and buy some credits or the API Key will not work.
*NOTE Even though you can login to OpenAI with a ChatGPT account, API usage is not included in your ChatGPT plan and is billed separately.
Follow these steps:
- Click Billing in the left sidebar.
- Follow the instructions to add a credit card.
- Purchasing some credits, the minimum amount OpenAI ($10 USD) will last a long time.
You are now ready to try iPhemeris AI Tools!
How API Usage is Billed
API usage is quite reasonably priced and is based on a rather abstract concept called tokens sent (in) and tokens received (out) as part of the answer. We are still learning about it, but can tell you that a typical Chart analysis costs approximately $0.02 - 0.03 USD (that is 2 - 3 cents).
To help you monitor usage and costs, iPhemeris AI Advisor shows the approximate charges (in $USD) of each conversation as well as your approximate Month-to-Date usage. This is not an official billing statement and is provided by us simply as a means to help you understand and monitor usage and costs.
Printing Defaults
Print Only In Black & White
Disables color printing throughout iPhemeris and improves readability for Black & White printers and/or saves costly ink.
Astrologer Information
You may enter up to 5 lines of Astrologer information that is displayed in the lower right corner of the Chart Wheel. This can be anything you want to appear on the wheel, including printouts.
Function Toolbar
Arrange which functions appear and in what order on the iPhemeris Tab Bar (across the top of the main application window). Restart iPhemeris to see your changes.
You can use this to add multiple Chart tabs if you wish.
Your Color Scheme
iPhemeris offers pre-defined color themes which can be selected via the settings button (gear icon) on most feature tabs. We have created a variety of themes that work well on displays, for black & white as well as color printing. These use generally accepted colors for various astrological elements and points. However, if you prefer to design your own color theme then this is the place to do it.
Your custom color scheme will be saved to iCloud and be available to iPhemeris on iOS devices running iPhemeris v 11.0 or newer

Defining A Color Scheme
Select the color well next to the symbol of wheel element you wish to customize. When you are done adjusting everything, don't forget to Save the changes.
The new scheme will be saved to iCloud so that you can use it for iPhemeris Charts and SkyNow on all your devices.
Your custom color scheme will appear as Your Colors in the Color Scheme selector associated with Charts and SkyNow.
SkyNow
SkyNow displays a Chart of the Sky that updates once every few seconds. It uses the House System and Location specified from the settings panel accessed via the gear button above the left sidebar panel.
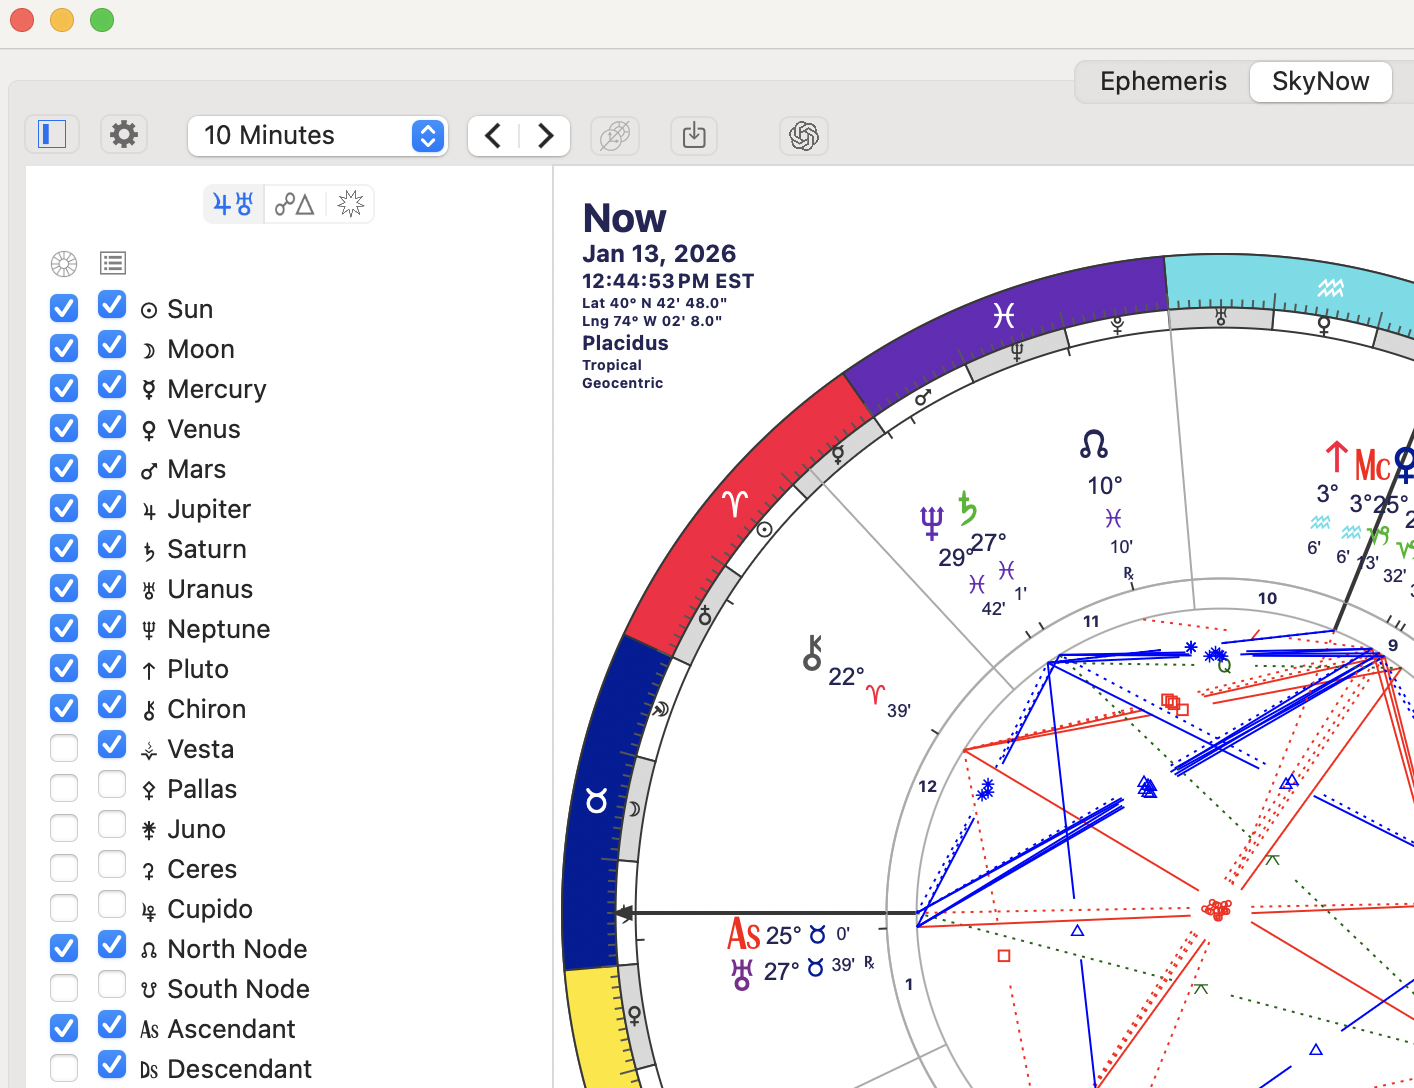
SkyNow Toolbar
The toolbar is just above the chart and sidebar panels.
- The Disclosure button will show or hide the left sidebar.
- Use the buttons in the Menu Bar:
- Show the SkyNow Settings Panel (gear).
- Set the Time Step increment.
- Time Step a chart Forward and Back.
- Stop time stepping and resume real-time updating of the SkyNow chart.
- Save the current SkyNow chart to your chart database.
- Open the AI Tools window.
- Drag the divider between the chart and the reports section to re-size charts relative to reports.
SkyNow Planets, Orbs, Stars
The Planets, Points & Orbs sidebar is where you control which planets, points, stars and aspects appear on charts and reports. It is also where Orbs are set. These settings are specific to the feature tab they are part of (SkyNow or Charts).
The 3 buttons at the top of the panel display different settings:
- The left button with the Jupiter & Uranus glyphs displays the Planets & Points panel.
- The middle button with the Aspect glyphs displays the Aspects & Orb settings panel.
- The Right Button with the Star glyph shows the Fixed Star selector panel.
Planets & Points (left button)
- The check box on the LEFT - under the wheel icon - controls:
- What is displayed on the chart wheel.
- And, what is overlayed on the Graphic Ephemeris as horizontal lines.
- The check box on the RIGHT - under the report icon - controls:
- What is displayed on reports.
- And, what is displayed on the Graphic Ephemeris as wavy lines.
Orb Settings (middle button)
- The check box next to the chart glyph toggles aspects ON/OFF on the wheel.
- The check box next to the report glyph toggles aspect ON/OFF in reports.
- There are separate Orb settings for:
- Planets, - for applying, + for separating
- Luminaries (Sun & Moon)
- Fixed stars, only 1 setting used for both applying and separating.
Fixed Stars (right button)
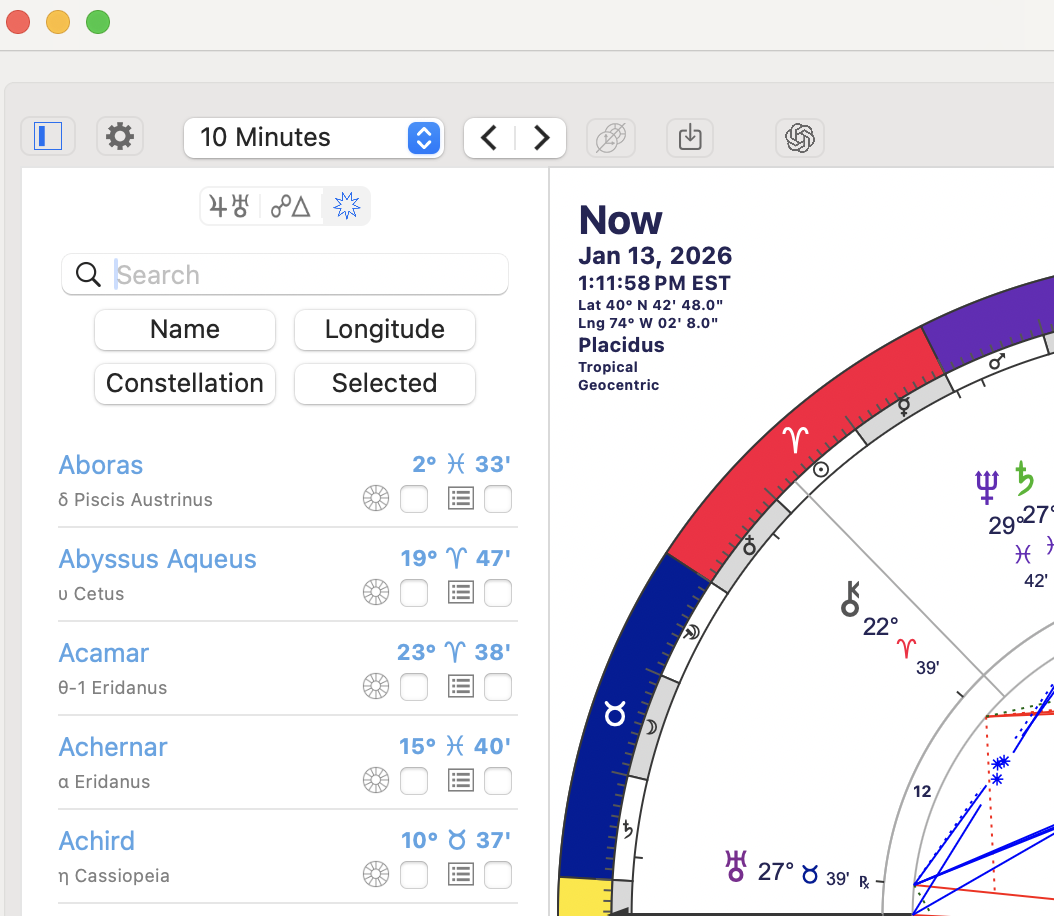
The fixed stars panel shows the approximately 800+ visible stars which the unaided human eye can see. There is quite a lot of mythological and ancient lore about these and they are very interesting to investigate astrologically.
The list functions like a fixed star Ephemerides and always shows the stars position in the sky for the current date. Stars move very slowly, and according to the rate of precession, so this list is more than enough for any given point in time.
Star names and constellations are localized into the languages the iPhemeris user interface support. We used AI to do this and it may not be great. User feedback will help us understand if we should have an option to disable localization for star names.
The Star List
Each star in the list shows:
- The common name in blue.
- The current position in the Tropical zodiac.
- The stars astronomical Greek letter designation and the constellation name which it is part of (gray).
- The show on Chart Wheel and Reports check boxes.
Search & Filter Stars
- Search Bar - You can search for stars by their name or the constellation they are part of.
- Sort & Filter - There are 3 sort buttons and 1 filter button:
- Name - Sorts the list alphabetically.
- Longitude - Sorts the list by zodiacal longitude so, in sign order through the 360° of the zodiac.
- Constellation - Sorts the stars by constellation which are listed alphabetically.
- Selected - This filters the list to show only the stars you have selected to display on a chart or report.
Currently, Stars will appear on all reports if you check their respective Report Box, except the Graphic Ephemeris. No fixed stars on the Graphic Ephemeris.
SkyNow Settings
SkyNow wheel styles and other settings are accessed via the Gear button in the SkyNow Toolbar. These settings apply only to SkyNow.
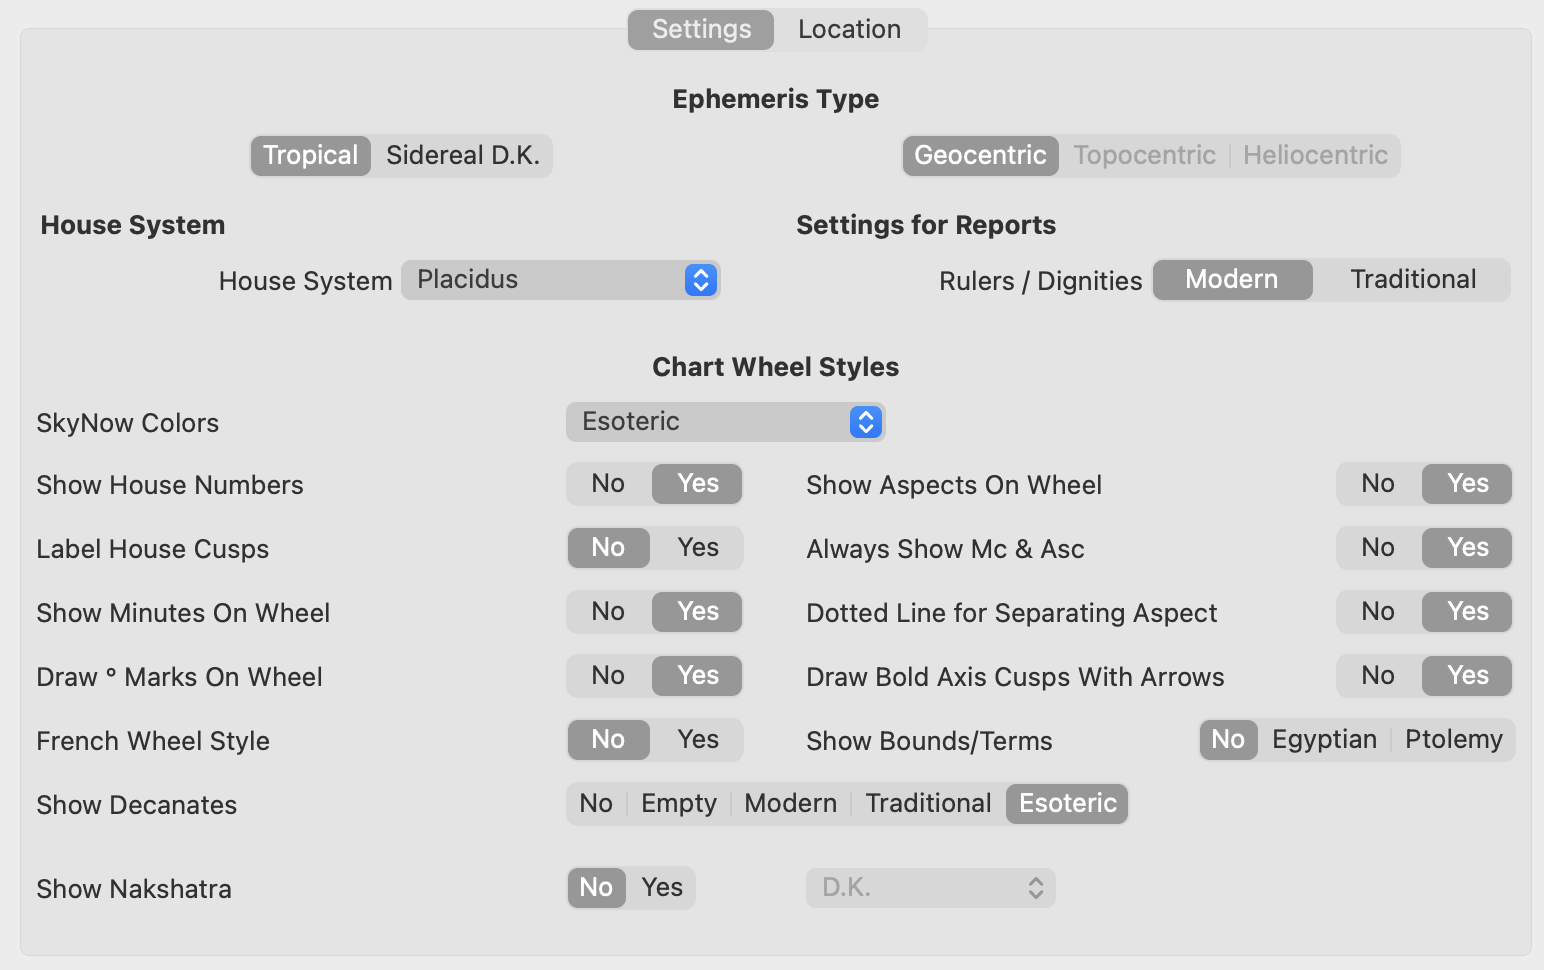
Ephemeris Type
- Tropical, Sidereal. The Sidereal button also shows the name of ayanamsa currently selected in iPhemeris Settings.
- Geocentric, Topocentric, Heliocentric. Topocentric & Heliocentric require and "All Access" subscription.
- Topocentric data will use the location and elevation at the location set in the Location Tab of this Settings panel.
House System / Rulers & Dignities
- Use the House System drop-down to select the House System.
- Toggle between Modern or Traditional rulers & dignities on reports.
Chart Wheel Styles
All of the Chart Wheel Styles change in real-time as you toggle them on or off. The best way to understand what they do is to have a chart displayed while you try each setting.
- Colors – Select a color scheme from the drop down. If you defined your own color scheme in iPhemeris Settings, select Your Colors in the dropdown.
- Show House Numbers – Turn On/Off the display of House numbers on the inside of the chart wheel.
- Label House Cusps – Turn On/Off house cusp labels.
- Show Minutes on Wheel – Turn On/Off the display of minutes for wheel placements.
- Minutes are not displayed on Tri-wheels.
- Minutes are ALWAYS displayed on reports.
- Show Aspects On Wheel – Turn On/Off all Aspects on the chart wheel. Use the Orb settings panel to disable a specific aspect on the wheel or reports.
- Always Show MC & Asc – Can be used to turn off display of points on the chart if they are the same as your selected house systems cusps. No effect on reports. E.g. when set to NO, the Asc point is not displayed on a chart using Placidus.
- French Wheel Style – Horoscope wheel is displayed in style preferred in France. Disables some of the other wheel style preferences.
- Dotted Line for Separating Aspects
- When ON separating aspects are shown using dotted lines.
- When OFF minor aspects are shown with dotted lines.
- Draw Degree Marks on Wheel – Turn On/Off the drawing of degree marks around the outer wheel.
- Draw Bold Axis Cusps with Arrows – Bolder lines with and Arrow for MC/IC and Asc/Dsc.
- Show Decanates – Toggle the style of Decanates on chart wheel:
- None
- Empty
- Modern Rulerships
- Traditional Rulerships
- Esoteric Rulerships as per Esoteric Astrology.
- Show Bounds, Terms, Limits – Display Egyptian or Ptolemaic Bounds on the wheel.
- Show Nakshatra – Display 27 Nakshatra divisions on the Tropical wheel based on selected Ayanamsa. The Ayanamsa settings is a global setting, set from iPhemeris Settings.
Location
Sets the location used by the SkyNow chart. Enter location data using any of the following techniques:
- Enter latitude / longitude values manually.
- Search for a place name or address.
- Scroll around the Map.
- When you use the map to get the lat/lng of the location, it also gets the altitude at the selected location for Topocentric charts.
Charts
Chart creating, editing and viewing is done from the Charts tab. The interface is simple and after familiarizing yourself with a few buttons you should be able to move around quickly.
Charts Toolbar
The buttons in the Chart Toolbar over the lists and side panels, explained from left to right.
Planets & Points Disclosure Button
Show / Hide the left side panel with settings for:
- Which Planets & Points are shown.
- Aspects & Orb Settings.
- Which fixed stars are shown.
- This panel is fully explained below.
Chart List Disclosure Button
Show / Hide the chart database list and the buttons for:
- Searching & Filtering the database.
- Adding, Copying, Editing and Deleting charts.
- This panel is fully explained below.
Chart Settings & Defaults
The gear button displays a panel with:
- Chart Wheel Styles.
- Default settings for charts.
- See the section on Chart Settings for details.
AI Tools Assistant
This button opens the AI Tools window. This is a very new and cool feature!! that enables you to get AI interpretations of your charts and ask questions about them. See the section on using AI Tools for details.
Chart Drop-Down Menu
This drop-down menu is enabled when charts are selected in the chart list. The items in the drop-down change dynamically based on the number of charts selected. See the section on
Note Buttons
The Note buttons activate when 1, 2, or 3 charts are selected. They display an editor with the notes of the respective chart. So the first button is for the 1st chart selected, the 2nd for the second selection, etc.
Notes added or edited via these panels are saved in the chart database. This is simply a convenient way to edit notes while you work without having to open the Chart editor.
Swap Bi-Wheel Charts
This button switches the position of the inner and outer charts in a bi-wheel.
Save Now Chart
This button saves the Now chart in a bi-wheel to your database. It uses whatever date & time it is showing when you save it, including if you time stepped it.
Time Step (Rectification) Buttons
- The Time Step Drop-down - sets the time increment for all the time stepping (rectification) buttons.
- Stop Time Stepping - Stops time stepping and returns all charts to their original values in the database.
- Forward/Back - One set of these buttons appears for each chart being displayed.
Note: Time stepping a chart does not change the original values in the database. If you want to preserve a date and time being displayed while time stepping, make a Copy of the chart and manually edit the date and time to the desired value.
Adjusting Text Size On Reports
Use the A/a buttons in the upper right corner of the Reports view. These adjust the size of text up or down. The setting is saved and will remain the same until you change it.
Printing Charts & Reports
Hover over the chart or report you want to print and Right-click or CTRL-Click. For reports you have to print each tab separately.
Chart Settings
There are many settings to configure the way charts are drawn, set defaults used when adding new charts, and what information appears on charts. You should familiarize yourself with all of them.
Chart Wheel Styles

All of the Chart Wheel Styles change in real-time as you toggle them on or off. The best way to understand what they do is to have a chart displayed while you try each setting.
- Colors – Select a color scheme from the drop down. If you defined your own color scheme in iPhemeris Settings, select Your Colors in the dropdown.
- Show House Numbers – Turn On/Off the display of House numbers on the inside of the chart wheel.
- Label House Cusps – Turn On/Off house cusp labels.
- Show Minutes on Wheel – Turn On/Off the display of minutes for wheel placements.
- Minutes are not displayed on Tri-wheels.
- Minutes are ALWAYS displayed on reports.
- Show Aspects On Wheel – Turn On/Off all Aspects on the chart wheel. Use the Orb settings panel to disable a specific aspect on the wheel or reports.
- Always Show MC & Asc – Can be used to turn off display of points on the chart if they are the same as your selected house systems cusps. No effect on reports. E.g. when set to NO, the Asc point is not displayed on a chart using Placidus.
- French Wheel Style – Horoscope wheel is displayed in style preferred in France. Disables some of the other wheel style preferences.
- Dotted Line for Separating Aspects
- When ON separating aspects are shown using dotted lines.
- When OFF minor aspects are shown with dotted lines.
- Draw Degree Marks on Wheel – Turn On/Off the drawing of degree marks around the outer wheel.
- Draw Bold Axis Cusps with Arrows – Bolder lines with and Arrow for MC/IC and Asc/Dsc.
- Show Decanates – Toggle the style of Decanates on chart wheel:
- None
- Empty
- Modern Rulerships
- Traditional Rulerships
- Esoteric Rulerships as per Esoteric Astrology.
- Show Bounds, Terms, Limits – Display Egyptian or Ptolemaic Bounds on the wheel.
- Show Nakshatra – Display 27 Nakshatra divisions on the Tropical wheel based on selected Ayanamsa. The Ayanamsa settings is a global setting, set from iPhemeris Settings.
Chart Defaults
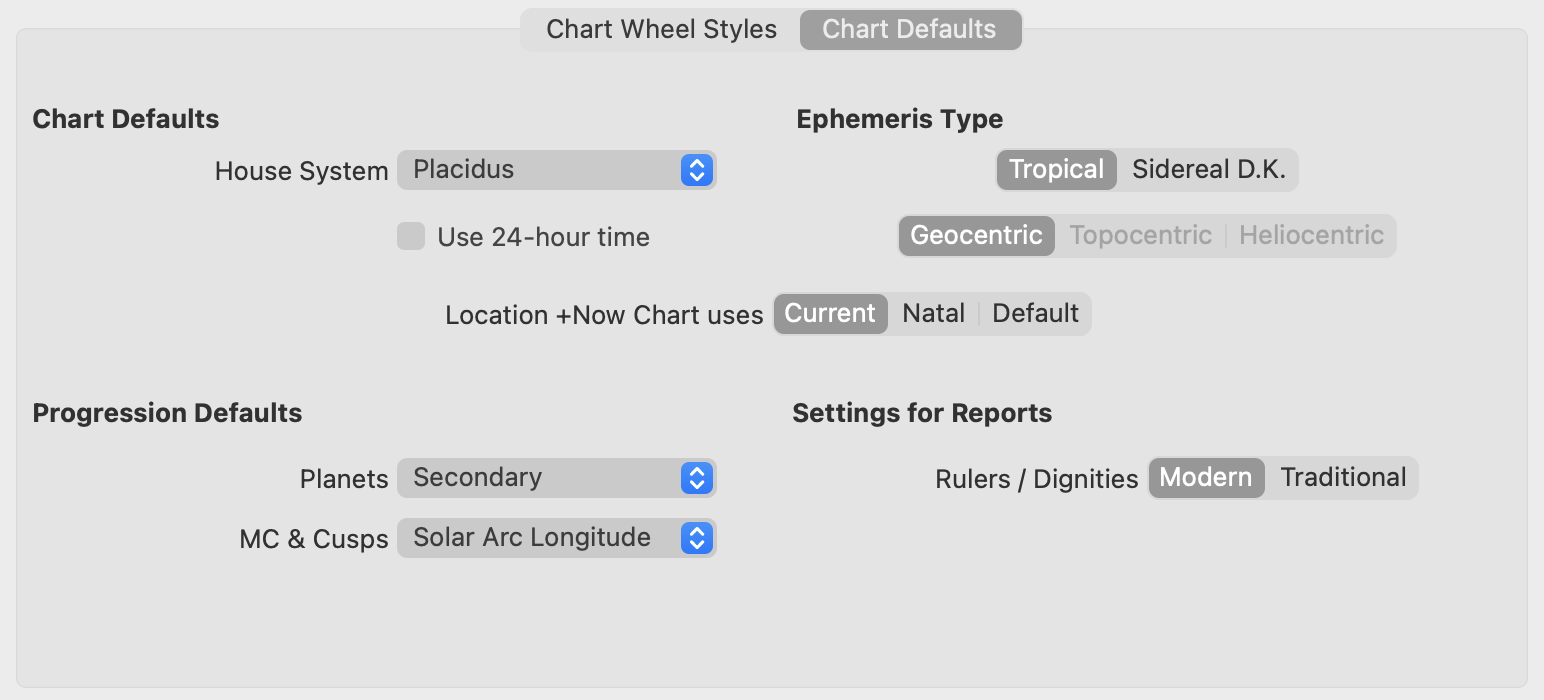
All of these settings are defaults used to pre-populate the Chart Add/Edit window. Any of them can be changed for an individual chart by using the Chart Editor to edit the charts data.
-
House System – The default house system when creating charts. Changing this does not change the house system used by charts already created. Edit a specific chart to change its house system, or make a copy and have one with both.
-
Use 24 Hour Time - Forces time entry and time display to use 24 hour style. This overrides time entry / display styles that are determined by your Macs date and time styles for your country.
-
Tropical / Sidereal – Individual charts can display either Tropical or Sidereal data. And you can have one chart using Tropical and another using Sidereal. Sidereal charts use the global Ayanamsa setting in iPhemeris Settings.
-
Geocentric / Topocentric / Heliocentric – Individual horoscopes can now use Geocentric, Topocentric or Heliocentric data. Topocentric & Heliocentric are available with an All Access subscription, see the iPhemeris store for details.
-
Location +Now Chart Uses – The +Now chart on a Bi-wheel uses the location specified by this setting:
- Current – The location used by SkyNow.
- Natal – The location used by the chart on the inner wheel.
- Default – The Default Location set in iPhemeris Settings.
-
Rulers / Dignities – Use Modern or Traditional Rulers on reports.
-
Progression Defaults:
- Progressed Planets - The default style used to Progress planets, bodies and any other point derived from their positions.
- Progressed MC & Cusps - The default style used to Progress the MC and Cusps.
Progression Types & Terminology
One often sees lack of clarity or confusion relative to the distinction between the terms Progressions and Directions. iPhemeris uses them in the following manner:
-
Progression - Moves the planets, bodies and angles in time, based on the actual planetary motion during the elapsed time between the date of the Natal or Radix chart, and the date of the Progressed chart.
- Progressions typically produce positions that can be found in an Ephemeris on the progressed date.
- Progression techniques produce charts where the angular relationships are constantly changing over time, just as they do in the sky.
-
Direction - Move all planets and points by the same amount or arc, either degrees longitude or Right Ascension (RA), depending on the type of progression used.
- Directions often produce positions that bodies did not occupy on the date of the directed chart. For example, Solar Arc directions move everything by the longitude the Sun moves. Mercury does not move at the same rate and will be shown in a position it was not actually in on the date of the directed chart.
- Directions are typically based on the Sun's arc in Longitude or RA, but they can also be based on the movement of other bodies.
- Currently iPhemeris offers directions based only on the Sun. Direction techniques keep all the angles between the directed elements the same.
Progression - Planets
-
Secondary Progressed – Planets & other bodies are moved 1 day for each year and fraction thereof between the date of the natal or radix chart, and the date of the progressed chart. Everything is shown in their actual position on the implied Secondary progressed date and time. iPhemeris calculates the exact interpolated position to the second. For example, in a Secondary Progressed birth chart for a person 30 years and 6 months old, you will see that the positions shown on the progressed chart are between the Ephemeris values on the 30th and 31st days after the birth date (accounting for time, timezone and location differences).
-
Solar Arc in Longitude – All planets are moved the same number of degrees (in longitude) which the Sun moved as calculated by the Secondary Progressed technique described above. Using this style of progression, planets will be in positions they never actually occupied (as a group) in time and space. For example, inner planets move faster than 1 degree per year and outer planets move less than 1 degree per year and so moving them all together at the rate of the sun's movement creates a configuration that never actually exists.
Progression - Cusps
-
Solar Arc in Longitude – The MC is progressed by the Sun's Solar Arc in Longitude from the natal or radix date to the progressed date. The Ascendant and cusps are calculated from the progressed MC's implied Right Ascension. Solar Arc in Longitude uses the distance the Sun travels along the plane of the Ecliptic.
-
Solar Arc in RA – The MC is progressed by the Sun's Solar Arc in Right Ascension from the natal or radix date to the progressed date. The Arc of RA is applied to the natal RAMC and then used to derive all the other cusp and sensitive points. Solar Arc in RA uses the distance the Sun travels along the Equator.
-
Naibod in Longitude – The average daily motion of the Sun in longitude (360°/365.24219879) between the natal date and the progress date is added to the MC and which is then used to derive the other sensitive points.
-
Naibod in RA – The average daily motion of the Sun in longitude (0° 59′ 8.33″) between natal date and the progressed date is added to the MC and which is then used to derive the other sensitive points.
-
Quotidian – Calculates the cusps using the actual date/time of interpolated progressed date. This is useful for progressing and doing Hoary analysis because the progressed cusps change throughout the year according to the fractional portion of the year of the radix. If you don't understand this explanation then use Solar Arc in Longitude.
-
Solar Arc Directed – MC, ASC and cusps are moved the same number of degrees in longitude the Sun moved, using the Secondary Progression technique.
Chart Planets, Orbs, Stars
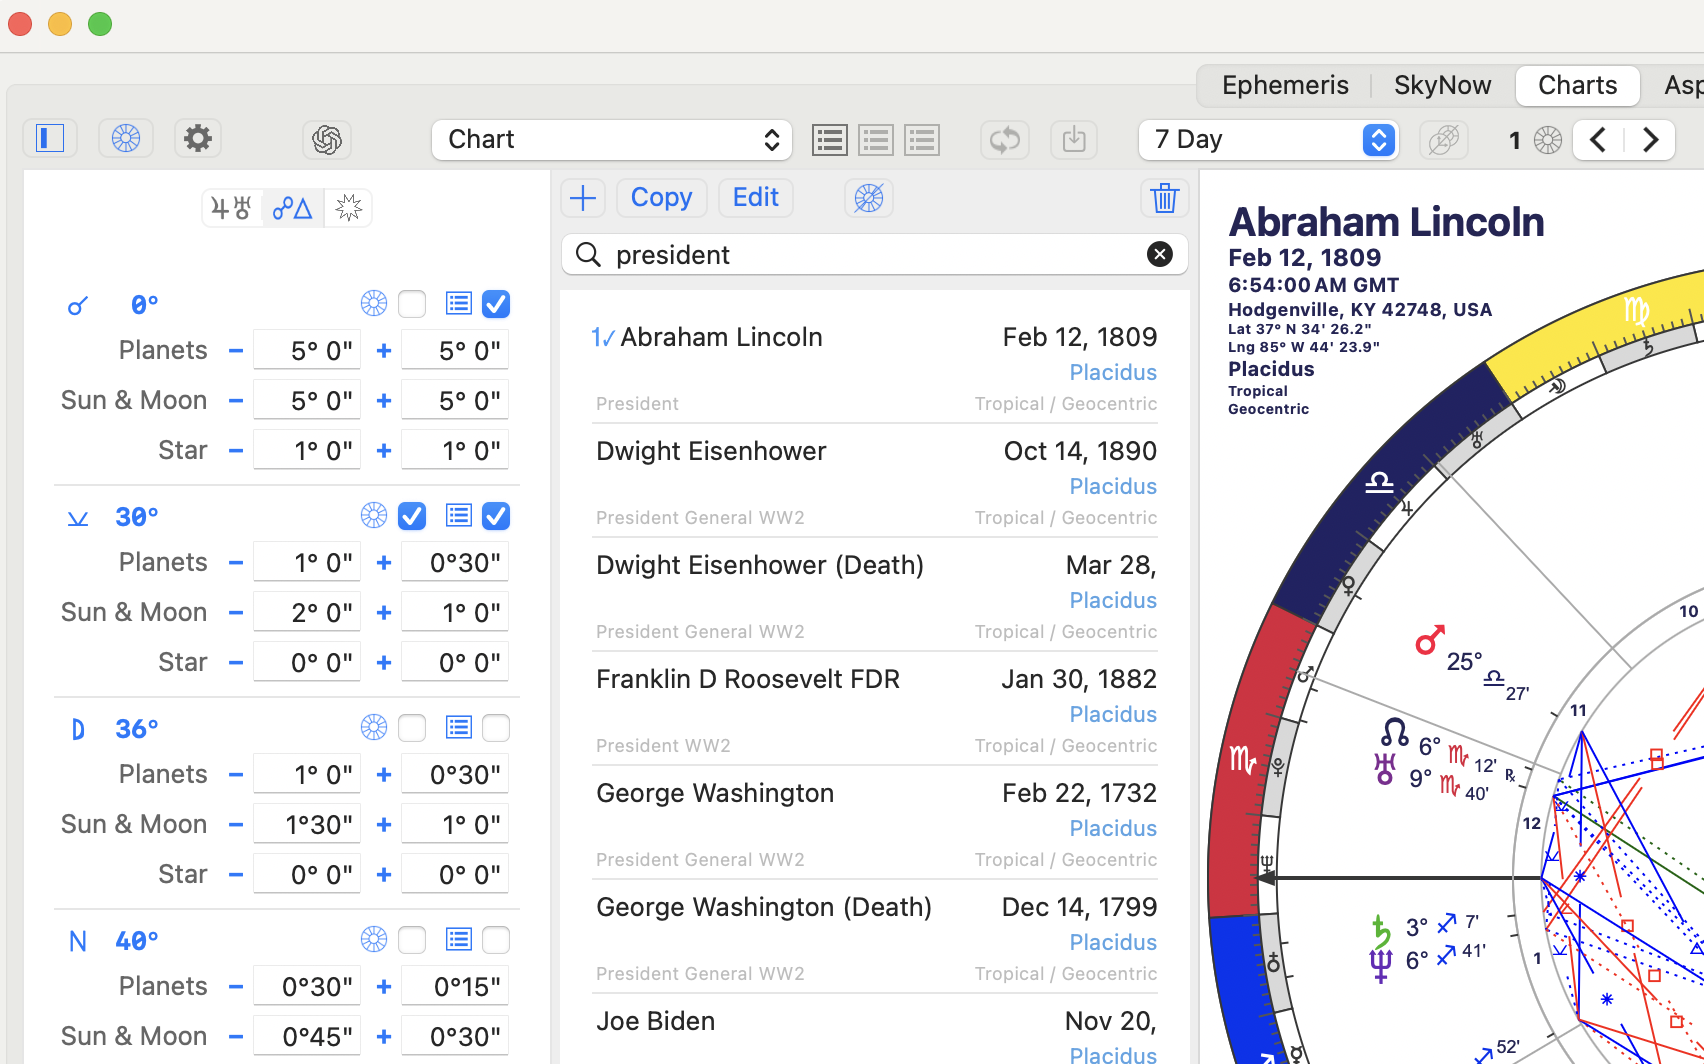
The Planets, Points & Orbs sidebar is where you control which planets, points, stars and aspects appear on charts and reports. It is also where Orbs are set. These settings are specific to the feature tab they are part of (SkyNow or Charts).
The 3 buttons at the top of the panel display different settings:
- The left button with the Jupiter & Uranus glyphs displays the Planets & Points panel.
- The middle button with the Aspect glyphs displays the Aspects & Orb settings panel.
- The Right Button with the Star glyph shows the Fixed Star selector panel.
Planets & Points (left button)
- The check box on the LEFT - under the wheel icon - controls:
- What is displayed on the chart wheel.
- And, what is overlayed on the Graphic Ephemeris as horizontal lines.
- The check box on the RIGHT - under the report icon - controls:
- What is displayed on reports.
- And, what is displayed on the Graphic Ephemeris as wavy lines.
Orb Settings (middle button)
- The check box next to the chart glyph toggles aspects ON/OFF on the wheel.
- The check box next to the report glyph toggles aspect ON/OFF in reports.
- There are separate Orb settings for:
- Planets, - for applying, + for separating
- Luminaries (Sun & Moon)
- Fixed stars, only 1 setting used for both applying and separating.
Fixed Stars (right button)
The fixed stars panel shows the approximately 800+ visible stars which the unaided human eye can see. There is quite a lot of mythological and ancient lore about these and they are very interesting to investigate astrologically.
The list functions like a fixed star Ephemerides and always shows the stars position in the sky for the current date. Stars move very slowly, and according to the rate of precession, so this list is more than enough for any given point in time.
Star names and constellations are localized into the languages the iPhemeris user interface support. We used AI to do this and it may not be great. User feedback will help us understand if we should have an option to disable localization for star names.
The Star List
Each star in the list shows:
- The common name in blue.
- The current position in the Tropical zodiac.
- The stars astronomical Greek letter designation and the constellation name which it is part of (gray).
- The show on Chart Wheel and Reports check boxes.
Search & Filter Stars
- Search Bar - You can search for stars by their name or the constellation they are part of.
- Sort & Filter - There are 3 sort buttons and 1 filter button:
- Name - Sorts the list alphabetically.
- Longitude - Sorts the list by zodiacal longitude so, in sign order through the 360° of the zodiac.
- Constellation - Sorts the stars by constellation which are listed alphabetically.
- Selected - This filters the list to show only the stars you have selected to display on a chart or report.
Currently, Stars will appear on all reports if you check their respective Report Box, except the Graphic Ephemeris. No fixed stars on the Graphic Ephemeris.
Chart List & Database
By default all charts added to the iPhemeris database (on any device) are saved to iCloud. We strongly recommend that you do not disable this. iCloud is the only form of backup that iPhemeris offers. The chart database does not use much storage and what it does use is money well spent. You will not be happy if something happens to your device or database and you lose your data.
You can hide the list of charts using the disclosure button in the toolbar. This creates more room for charts and reports.
-
Chart List - displays the charts in your database which this device can read. If you do not see a chart that you think you should, check the FAQ and iCloud sections of this documentation.
- Show a Chart - find a chart in the list and click to select it.
- Add - Create a new chart by clicking the ‘+' button.
- Copy - Makes a copy of the selected chart. The button is disabled if more than 1 chart is selected.
- Edit - Edit the selected chart. The button is disabled if more than 1 chart is selected.
- Clear Selected - Un-selects all charts (its the button with a chart icon with a line through it). This is useful when the selected chart is off screen or hidden by a search filter.
- Delete - Deletes the selected chart from your database. WARNING! This is permanent, there is no way to recover a deleted chart. The button is disabled if more than 1 chart is selected.
- Search Bar - Search charts by Name or Category. If you have added category tags to any of your charts, for example President, you can filter the list to only show charts “tagged” with the word President.
-
Charts drop-down - The Charts drop-down menu in the toolbar shows display options for the number of charts currently selected (1, 2 or 3) in the chart list. The options change based on the number selected. For example, when only 1 chart is selected, it will show Charts, and Charts +Now. The second options shows the selected chart in a bi-wheel with a chart for the current date and time.

Searching & Filtering Charts
The Chart Search Bar is at the top of the Charts list in all versions of iPhemeris (iOS and macOS) and it works the same way. Any text entered into this bar filters the list to show only matching items.
Text typed into the Search Bar filters charts based on 2 fields in your Charts (it is not case-sensitive):
- The Name field of each chart.
- The Category category field of each chart. You will see the category field when you are editing or creating a chart, under the House System selector on the top panel.
Simple Search Example
If there is a Chart in the database with:
- George Patton in the Name field.
- WW2 in the category field.
You can find it by entering either patton or ww2 into the search bar.
Note: Search uses a word begins with type of search and matches partial words. Keep this in mind when adding categories and searching. E.g. 'w' will match ww2 and women categories and you would need to search for 'ww' to only see charts categorized with WW2.
Categories
The Category field is useful for grouping charts and is better than a folder system. It is better because something can have many categories (policticians, men, women), but can be in only 1 folder.
Categories, sometimes called Tags, are single words separated by a space or comma:
- You can add as many category words as you like.
- The only restriction is that words cannot include the '/' character.
- If you need to create a multi-word category, hyphenate it or put an uderscore between words. Search sees hyphenated words as a single word.
Use categories to filter the list to display only items with matching categories.
For example if you categorized:
- George Patton's chart with: WW2 general
- Dwight Eisenhower's chart with: WW2 general president
Entering the following into the Search bar displays:
- WW2 or general - displays both Patton & Eisenhower.
- president - displays only Eisenhower.
More Sophisticated Searches
Use the '/' (forward slash) character to create more sophisticated searches:
- Text entered to the left of the / character will be restricted to being in the Name field.
- Text entered right of the / will be searched for only in the Categories field.
- Words on the right of the / and which are separated by a space will be combined using AND to enable searching for a combination of categories.
Example
- To find all charts your database with Patton in the Namefield and WW2 in the Categories field enter: Patton / WW2.
- To find all charts in your database where only the Categories had Actor AND German, enter: / actor German.
Displaying Charts
To display one or more of the charts in your chart list:
- Select 1, 2 or 3 of them in the list.
- Use the drop-down Charts menu in the toolbar to select how to display and combine them.
- The drop-down options change depending on the number of selected charts.
Display 1 Chart
- Click the row of the chart to draw, it will be instantly displayed.
- To show the selected chart in a bi-wheel with a chart for now, choose Chart +Now from the drop-down menu.
Display 2 Charts (bi-wheel)
- Click any 2 charts in the list. The 1st will be on the inner wheel and the 2nd on the outer.
- To add a third now chart use the drop-down.
- To combine them as a Composite chart use the drop-down.
Display 3 Charts (tri-wheel)
- Select any 3 charts in your list.
- Use the drop-down to combine them in other ways.
Display Composite Chart
- Select 2 Charts.
- Select Composite from the drop-down.
Display Natal, Relocated, Progressed & Solar Return
All of these chart types have to first be created and added to your database (with the exception of Composite). To add one, see the next section. It is a simple matter of making a copies of a Natal chart and adding additional data. Then you use the above steps to display them.
Adding & Editing Charts

Creating A Natal Or Event Chart
Note: Enter data in the order of the editor fields, top to bottom. Time Zone lookup needs a date, time & place to work correctly.
- Name - Can be anything you want (required).
- Date and Time - When erecting a birth chart, use the time as it appears on the birth certificate. Do not adjust it for daylight savings.
- Location - Click the Edit button to the right of the location data. A Map will drop down. Use the map to:
- Search for a location by name or even street address.
- Or find a location by dragging and zooming in the map view.
- Or, manually enter latitude & longitude.
- The position under the cross-hair is what is used and will be more or less precise depending on how much you have zoomed in.
- FYI: The map requires internet access.
- Time Zone
- Use Find Time Zone button (recommended) to look up the correct time zone.
- Date, Time & Place must already be entered or this button will not work correctly.
- Time zone lookup requires internet access.
- Or, if you know the correct time zone value, you can enter it manually. iPhemeris uses standard time-zone notation:
- Time zones West of GMT are negative (-).
- Time zones East of GMT are positive (+).
- Local Mean Time – This is for very old dates, before time zones. It calculates a time zone from the chart longitude. It is for historical research. Only use it if you know when and how to use it.
- Use Find Time Zone button (recommended) to look up the correct time zone.
- House System - Select a house system to use for this chart. This setting overrides your default setting for this chart only.
- Categories - Add words to categorize your charts. Separate individual words by a comma or space. These can be used in the chart list to search, filter and group your charts.
- Notes - Add and edit notes for this chart.
- Tropical / Sidereal – Individual charts can display either tropical or sidereal positions (tropical or sidereal is no longer a global setting). Sidereal uses the global setting for Ayanamsa set from iPhemeris Settings.
- Geocentric / Topocentric / Heliocentric – Horoscopes can display positions for any of these types of data.
- Topocentric and Heliocentric require an All Access subscription or they are grayed out.
- Topocentric charts need elevation (altitude above sea level). Elevations is obtained when you use the map to get the location.
- If you have an existing chart and are switching it to display Topocentric data, use the Map to get the location again so that elevation is obtained.
Relocated, Progressed & Solar Return Charts
Use the Copy button to duplicate a selected chart, then Edit the copy and add the additional required data.
- Select a chart in the list.
- Click the Edit button.
- Open the section of the Editor that relates to the type of chart you want to create.
Relocation Chart

Relocation charts require the natal location as well as the new location. Follow these steps:
- Copy a Birth chart.
- Select the copy and open the editor.
- Open the Relocation panel by clicking its check box.
- Add the data for the second location using the Edit button to open the Map view.
Progressed Charts

Progressed charts require additional information. Follow these steps:
- Copy a Birth chart.
- Select the copy and open the editor.
- Open the Progression panel by clicking the check box.
- Check the Progress to Now button for a progressed chart that is always progressed to when you display it.
- Un-check the Progress to Now button if you want to set a specific, date and time that will not change.
- Choose a Planet and Cusp progression styles.
Note: Progressed charts can be both Relocated and Progressed.
Solar & Lunar Return Charts
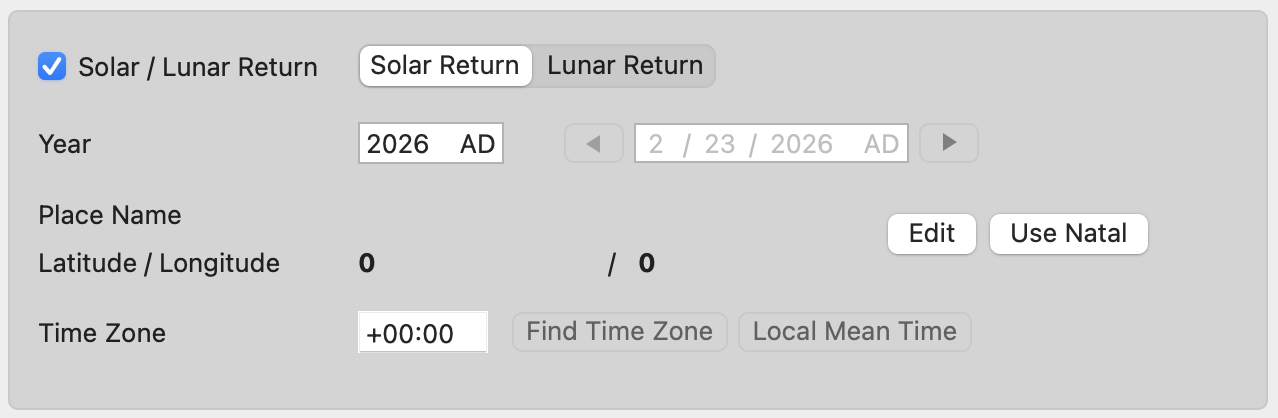
Solar & Lunar Return charts require additional information. Follow these steps:
- Copy a Birth Chart.
- Edit the copy.
- Check the box next to Solar / Lunar Return.
- Select a return type.
- Add the additional information.
Solar Return
- Year - Enter a 4 digit year for the solar return.
- Location - Set location for where the subject was at the time of the Solar Return. Either:
- Use the Edit button to open the map and set it via that.
- Or, click Use Natal and the location will be set to use birth location.
- Time Zone - A time zone is required:
- Enter it manually, or use the Find Time Zone button after year and location are entered.
- Local Mean Time – This is for researchers and should only be used by those who understand how and when to use it.
Note: Solar Return charts cannot also be Relocated or Progressed.
Lunar Return
- Enter a date in the date editor close to the date you are erecting the chart for.
- Use the arrow buttons to find a Lunar Return near the date you entered.
NOTE: If one of the panels you opened and entered data in does not remain selected after leaving the Edit Chart dialog, it is because iPhemeris did not find all the data needed to display that type of chart. Please try again and make sure that you enter all required data.
Time Zone Lookup
iPhemeris uses an international, open source Time Zone database known as TZDATA. You can read more about it here: TZDATA on Wikipedia
- Time Zone lookup requires Internet access (Wifi or a mobile data connection).
- It requires that the: Date, Time and Location are already set.
- Find Time Zone – This button queries the database for the Time Zone in effect for the data and time at the location.
- Local Mean Time – Calculates a Time Zone based purely on Longitude. This is only recommended for researchers and very old dates.
TZDATA is contributed to and corrected by computer scientists all over the world. It was originally created to be an accurate source of Time Zone data for computer clocks around the world. Computers need to know when a specific location switches between regular and Summer or Daylight time (DT). Due to the various and politically complex dates when places around the world have adopted and repealed Summer Time, the database can sometimes be off by 1 hour in a specific location. This is happening less and less frequently due to continuous updating and improvement. Anyone finding errors can report it to TZData by providing 3 sources proving the error, e.g. newspaper articles, etc. TZDATA is now the most accurate historical record of time zone data and clock changes anywhere in the world.
For USA locations, errors sometimes occur for dates prior to 1966 (when DST was mandated nationwide). When errors of this type occur, it is typically that the date for the switch between DT and DST is incorrect. This will produce an ascendant difference of approximately 15 degrees. If you are seeing an unfamiliar ascendant or mid-heaven value, do not assume iPhemeris is wrong, do a Google search for when Daylight/Summer time was adopted at the place of the chart being cast.
Some software uses an old source of historical time zone and daylight savings changes called the ACS Atlas and which is based on The Olsen Database, the predecessor to TZDATA. Unfortunately, the ACS atlas is known to have many errors, so much so that the developers of TZDATA decided they could not use it as a starting reference point. They analyzed ACS's accuracy and uncovered too many errors. The developers of iPhemeris have also observed over the years many many errors in charts based on ACS. We therefore concluded that the safest approach was not to include it, and we suggest that when a discrepancy arises between TZDATA and a chart obtained from elsewhere, do some research.
Time zones and Daylight / Summer Time are an important subject for Astrologers to be familiar with and it will be well worth your time to study a bit about the subject.
AI Advisor
About AI Advisor
iPhemeris now includes one of the most powerful astrological tools you have ever used: iPhemeris AI Advisor.
For the first time, iPhemeris goes beyond charts and calculations to provide complete professional-level interpretations directly inside the application. AI Advisor analyzes the charts stored in the iPhemeris database and delivers detailed astrological insight instantly.
AI Advisor evaluates the full structure of a chart, including:
- Planetary Placements.
- House Cusps.
- Aspects.
The result is a comprehensive interpretation of the chart’s dynamics, written in clear professional language suitable for both serious students and practicing astrologers.
Unlike static interpretations, AI Advisor is fully interactive. After generating a report, you can continue the discussion with the AI: ask follow-up questions, request deeper analysis, or explore specific themes.
And, if during the coures of a conversation, the AI asks for additional information to refine its interpretation or answer your questions, you have the tools to provide what it needs!
This interactive approach allows you to investigate any dimension of a chart, including:
- Relationships and compatibility (synastry).
- Life timing and transits.
- Personal development.
- Health and medical astrology.
- Psychological and spiritual themes.
- Practical life questions and decision timing.
Because AI Advisor works directly with the charts already stored in your iPhemeris database, it becomes a research and interpretation partner, helping you explore charts more deeply and efficiently than ever before.
With iPhemeris AI Advisor, your chart database becomes not just a collection of charts—but a living resource for continuous astrological exploration.
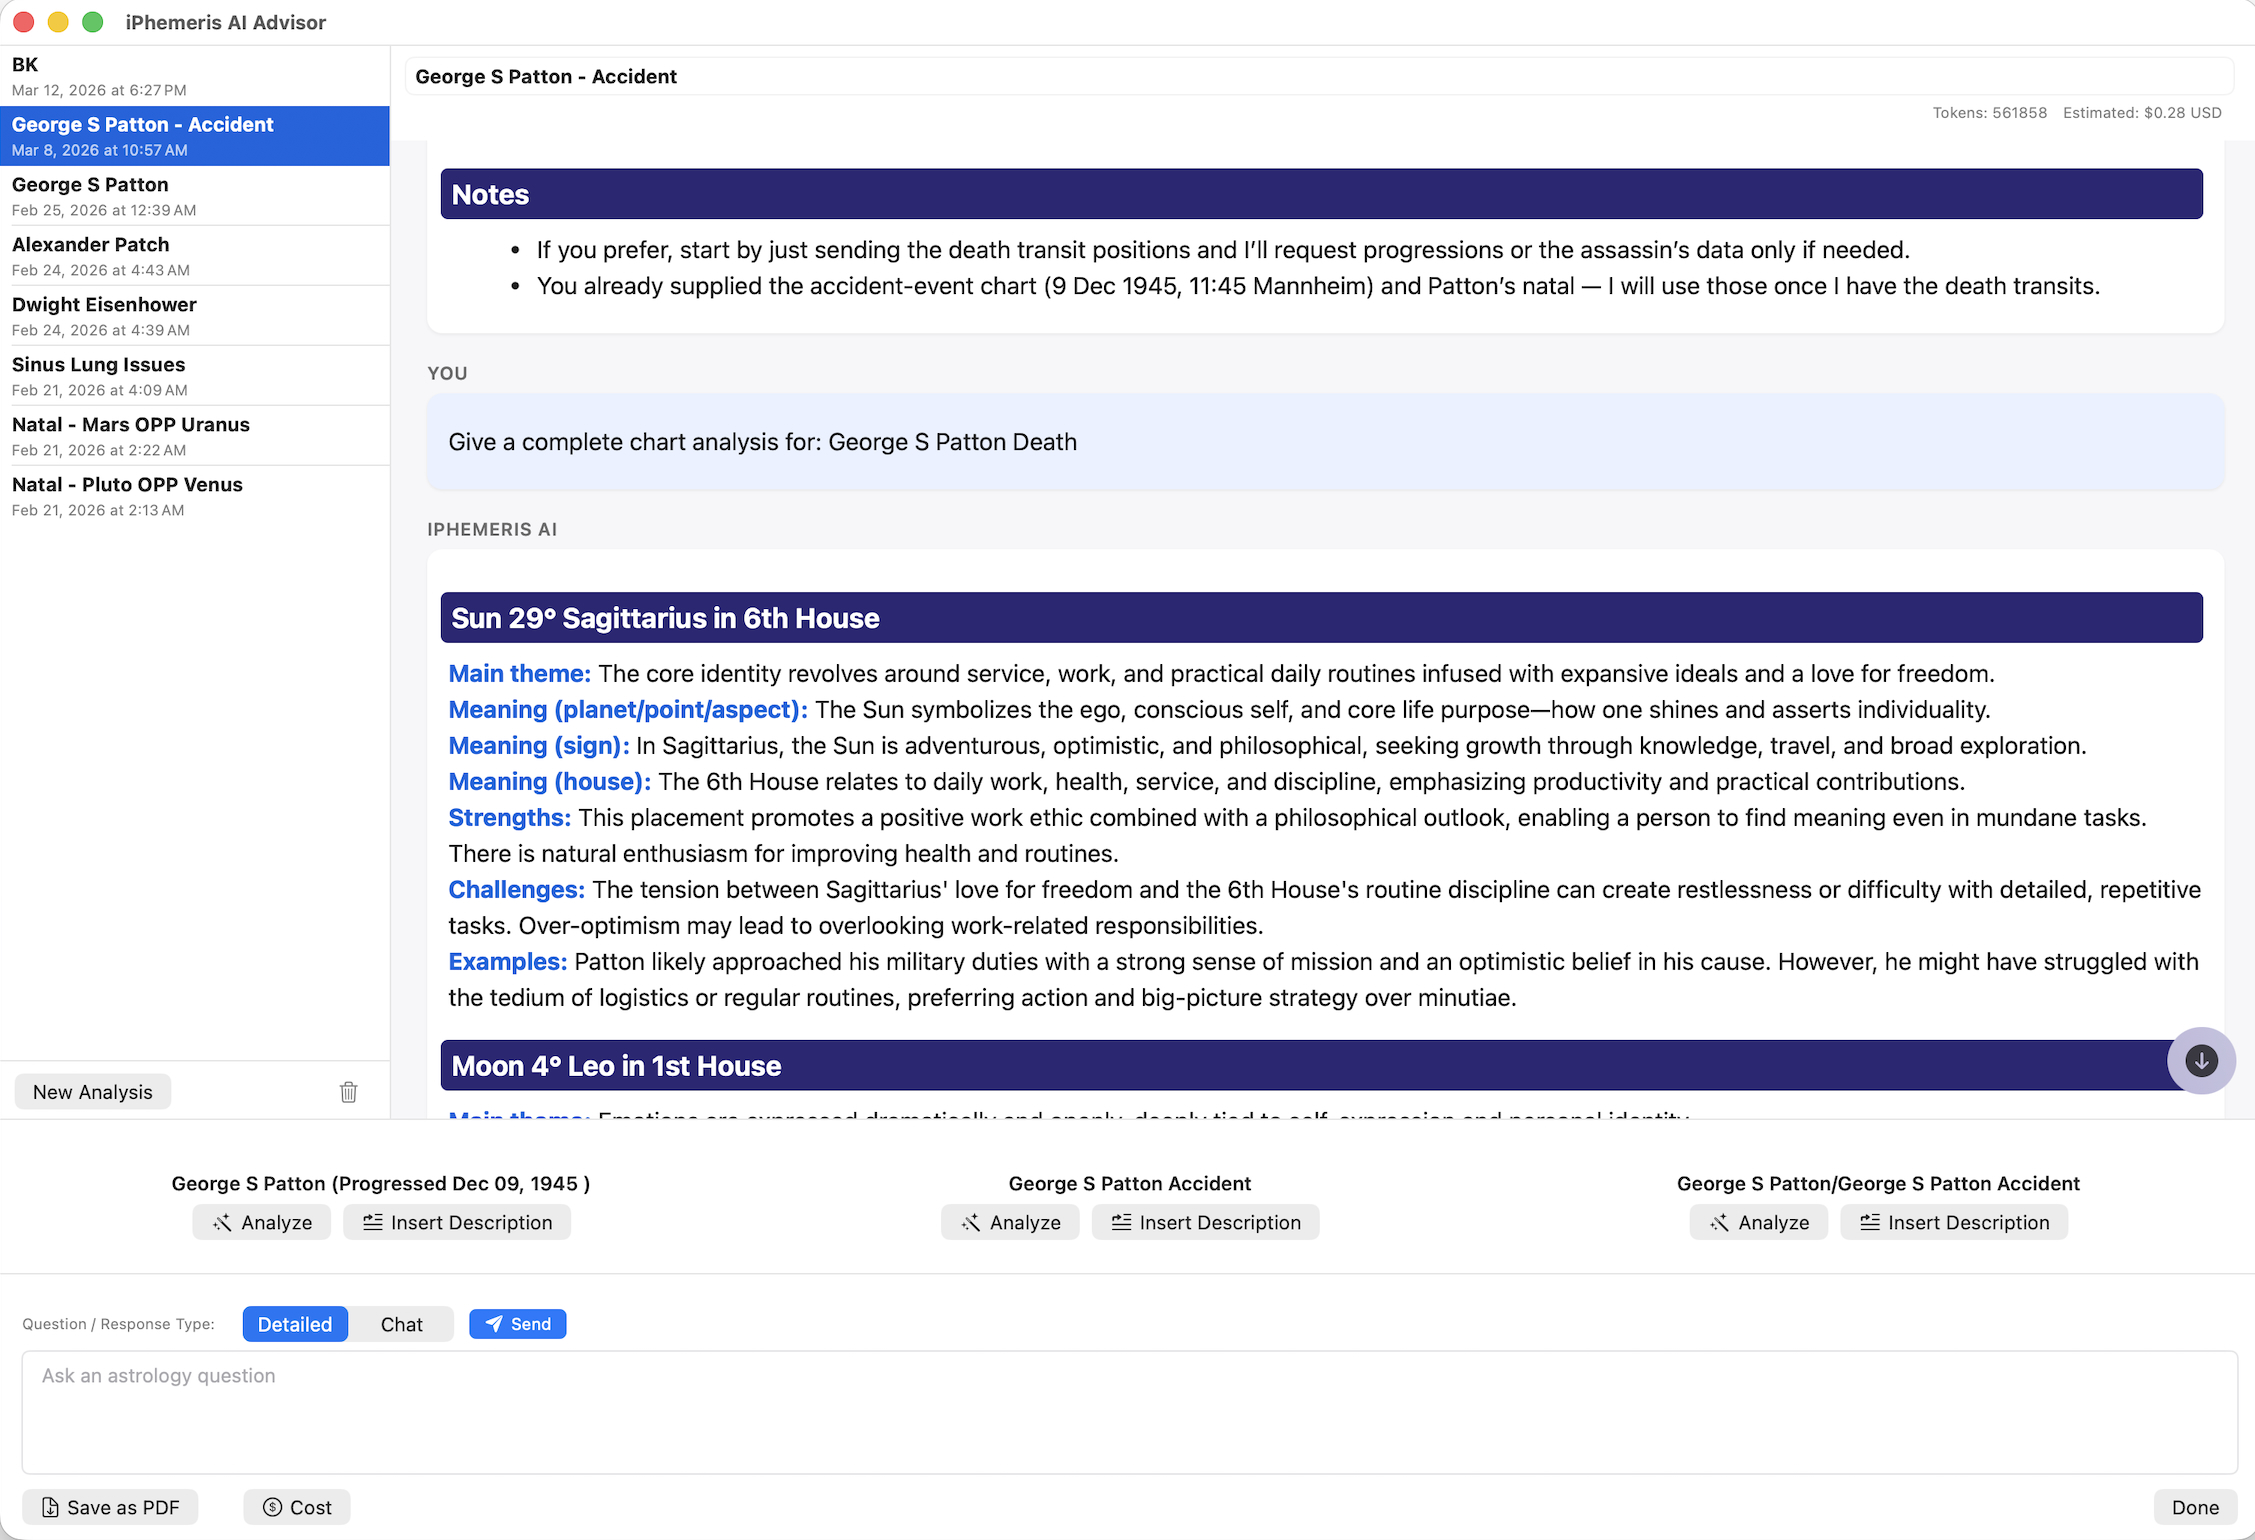
Using AI Advisor
iPhemeris AI Advisor panel is accessed by clicking the button with the ChatGPT icon in the Charts and SkyNow toolbars. The panel is easy to use and very flexible. Hover the mouse over a button to display more information about its function.
The panel will always display Analyze buttons for the first two charts currently selected in your Chart Tab's chart list, with one additional button for Contacts between them. These buttons will change to reflect your currently selected charts. On SkyNow, there is only a button for the "Current Sky".
List of Analyses
The left side of the panel displays a list of previous analysis conversations. They are automatically saved to iCloud along with your charts and are available to iPhemeris on any of your devices which support AI Advisor.
- Select a previous conversation in the list to re-read or continue the discussion.
- Add other charts to the selected conversation by clicking another charts Analyze button, or using the Insert Description button.
Buttons Explained
New Analysis - Start a new conversation and which will be saved separately.
Analyze - Analyze buttons appear for the first & second chart currently selected in your list of charts. Click the Analyze button to request a highly formatted, very detailed, analysis of that Chart's Placements, House Cusps and Aspects.
Insert Description - Inserts a complete verbal description of the Chart into the Question box.
- Use this button to ask questions or provide the AI with additional chart data when it requests it during a conversation.
- This button only inserts data into the question editor, it does not send or request anything.
- Use the Send as New Question, or Send as Conversational Question buttons to send inserted data to the AI.
Cancel - This button appears when an analysis is in process, clicking it stops the analysis.
- Once terminated it cannot be completed.
- However, you can ask questions about any portion of the conversation that did complete prior to cancelling.
- And you can insert new descriptions or analysis into the existing portion of the conversation.
Continue - Sometimes the AI will not finish an analysis when it is taking too long. Use this button to instruct it to continue analyzing from where it stopped.
Question / Response Type
- Detailed - This button instructs the AI that you want a more detailed and formal response for whatever you entered into the question box. It can be used in several ways:
- If you just started a New Conversation and want to ask a question about anything, for example: What are the astrological significators of a particular health issue?
- Or, after having obtained a full analysis, use it to explore some aspect of the analyzed chart.
- Chat - This button sends the data in the question box with a request for a brief and lightly formatted response. It can be used in several ways:
- To provide the AI with a Chart description when it asks during a conversation.
- To ask a quick quesstion for which you do not want a more formatted and detailed response.
- Send - Sends the contents of the Question Editor to the AI.
Delete (Trash) - Deletes an Analysis/conversation from your database. This is permanent; deleted charts cannot be recovered.
Save as PDF - Save the entire contents of the currently selected conversation to a PDF file which can be emailed, saved or printed.
Cost - This button displays an estimate (in USD$) of your Month to Date usage. It is only an estimate and we make no claims about its accuracy. See your OpenAI account for your official OpenAI charges and statements.
Conversation Title Bar
At the top of the analysis panel the title of the currently selected conversation is displayed. It can be edited at any time. Hit return key after editing it to save the changes. Changes are immediately saved to the database.
Also shown just below the title is the estimated cost and token usage for the selected conversation.
Usage
iPhemeris AI Advisor is extremely flexible and capable and there are very few restrictions (other than formatting) placed on it. You can ask it anything you want about a chart or even other subjects! For example, during the course of a conversation you might ask it to also investigate a clients numerology. It can do that amazingly well, including giving you several styles of numerological analysis.
The Analyze buttons request a very verbose analysis of whatever chart you feed it. The formatting for this function is rigid and detailed. It is almost too much information. However, you can at any point, ask the AI to give you a less verbose summary more suitable for a client.
When asking the AI for something:
- Be clear, precise and direct.
- Explain exactly what you want and do not want.
- If you ask for a summary or simpler version of an analysis, tell the AI which topics or themes you want included. For example: life direction, best career path, most suitable type of partner, etc.
The AI has crawled the entire internet of Astrological things and has an amazing depth and breadth of understanding. Use it to explore your charts and how astrology impacts life questions.
Examples
The more you use AI Advisor to explore various aspect of your own or a clients chart, the more you will realize just how powerful a tool it is. To help you get started and to give you some ideas, here are a few of the things we have already tried:
-
Get a detailed analysis of any of your charts, then ask it via one of the question buttons, questions like:
-
Do you see any indications of potential health issues in this chart?
-
What are the best type of relationship partners for this person?
-
What type of career is the person suited for or will excel in?
-
When is a good time (or a time to avoid) to make a business deal.
-
Start a new conversation. Don't give it any chart, simply enter a question into the question box. For example:
-
what are the Astrological significators for some health condition?
-
What type of transit is associated with accidents?
-
Explore a potential crime. Give it several charts,like a persons birth and death chart and ask it:
-
If the death was natural or medical malpractice.
-
Or, if the death might have been a killing made to look natural or like an accident.
The uses are endless. Explore it and let us know your thoughts and feedback. Enjoy, it is an amazing tool!
How OpenAI Bills
OpenAI / ChatGPT charge based on token usage. Tokens are a fuzzy concept and can be a single word, part of a word, a punctuation mark, or even a blank space. A "question" and the subsequent "answer" get broken up into tokens by the OpenAI engine and billed accordingly. iPhemeris estimates the cost based on the token numbers included in the OpenAI response during a conversation and which we multiply by the published OpenAI API pricing.
Pricing differs by AI Model. iPhemeris uses gpt-4.1-mini for chart analysis and gpt-5-mini for question and answer. Each model has two charges, one for the question (tokens in) and one for the answer (tokens out).
You can look up the current API Model charges on the OpenAI website.
Ephemeris

The Ephemeris in iPhemeris is a powerful tool that can displays Tropical, Sidereal, Topocentric & Heliocentric data for any location and time around the world.
With a few simple settings, it can be a standard monthly Midnight or Noon ephemeris for any time zone you like! Or, set it for some other time of the day you care about like Stock Market open!
Ephemeris Display
The Ephemeris Tables are the same on all versions of iPhemeris regardless of platform (iOS or macOS):
- Montly pages display a full month of data for planets, other bodies, lunar phases, lunar ingress, lunar “void of course” times & eclipse data.
- Data is grouped into weeks that can be customized to start on Sunday or Monday.
- The Date column shows day and day of the week.
- A GST column displays Greenwich Sidereal Time.
- Two Moon columns are available:
- The 1st displays the Moon's position at the time & time zone you set the Ephemeris to display for.
- A second optional column displays its position 12 hours later.
- Moon and Sun columns are not shown when displaying Heliocentric data.
- Columns for individual planets and other bodies can be toggled on or off.
- Display of planetary longitude is in Degrees, Minutes and Seconds orders.
- The display of planetary declination and latitude is in Degrees, Minutes and seconds. Declination is on the left and latitude on the right.
Ephemeris Toolbar
Most of the buttons needed to use and configure ephemeris pages are in the toolbar. A few global settings also affect it. See the Preferences section to learn about those.
The buttons are, from left to right:
- Disclosure Button - Shows or hides the left sidebar.
- Use the sidebar to select the planets & asteroids displayed on ephemeris pages.
- Data Export - The button with a download icon at the top of the left sidebar opens the data export panel.
- Select columns to export.
- Export Data - Configure export date range, periodicity and fields. See the Data Export section for instructions.
- Gear - Ephemeris configuration settings. See below for instructions.
- Date Search - Enter Month & Year to jump to specific date.
- Date Scroll - Scroll back & forward 1 month at a time.
- Today - Display the page for the current month with the current days date highlighted.
- Print - Print the currently displayed page. Use the iPhemeris Settings panel to configure if you prefer to print Black & White or color.
- AA / aa - Adjusts ephemeris page text size.
Note: An All Access subscription unlocks more data columns & Data Export. See the iPhemeris store to learn which additional columns are included.
Ephemeris Date Search
Use the Date entry field to jump to a specific Month & Year:
- The Extended Ephemeris (included with an All Access subscription) allows jumping to BC dates. Click AD / BC to toggle it.
- There is no year 0 in the Extended Ephemeris.
- When displaying months prior to year 1 the page title displays the year in the Julian (Astronomical) Calendar which does have a year 0.
You can highlight any day row by clicking it to make it easier to follow and read across the page.
Ephemeris Settings
Ephemeris configuration settings are accessed via the Gear button in the toolbar. These settings affect only the Ephemeris views.
- Time Zone - Sets the time zone for the data in the table.
- Ephemeris Hour - Set the hour of the day you want the data on the page to be for.
- Data Precision – long or short display format.
- Color Scheme – select a color scheme for the ephemeris pages.
- Tropical or Sidereal – This setting relates only to the data displayed on the Ephemeris pages. The Sidereal setting uses the Ayanamsa selected in iPhemeris Preferences. The Ayanamsa currently selected is display as part of the Sidereal button text.
- Geocentric, Topocentric, Heliocentric – Topocentric and Heliocentric are included with the All Access subscription. See the iPhemeris store for details and to upgrade.
Time Zone & Ephemeris Hour
Ephemeris pages are static, they do not change and - like a book - display positions at the hour & in the time zone you set. These setting controls which hour and in what time zone.
- Time Zone – iPhemeris uses standard Time Zone notation:
- Locations East of Greenwich England are positive (+). E.g. Paris France +1 or +2 depending on DT.
- Locations West of Greenwich England are negative (-). E.g. New York, depending on DT is -5 or -4.
- This setting does not auto adjust for changes to or from summer time. You must change it manually.
- Ephemeris Hour – Sets the hour in the the selected Time Zone.
Examples:
- For a Noon GMT+0 Ephemeris, set a Time Zone of UTC (GMT) 00:00 with an Hour of 12.
- For a Midnight Ephemeris in your Time Zone, set the Time Zone to your time zone and the Hour to 00:00.
- For a New York Stock Market Ephemeris, set the Time Zone to -5:00 (or -4 during summer time) and the Ephemeris Hour to 9:30.
Lunar & Planetary Tables
Ephemeris pages have several tables related to the Moon and Planetary Ingress at the bottom of each page. Some of them require an All Access subscription. Most of them are similar to the various printed Ephemerides in the way the data is presented.
The Various Table Are (left to right):
- Last Aspect (Void of Course).
- Lunar Ingress.
- Planetary Ingress.
- Moon Phase
- Eclipse (if there were any).
- Solstice and Equinox time.
Void of Course Tables
Void of Course Lunar tables are located at the bottom of each monthly page in the lower left.

Last Aspect
- Time Columns – There can be up to 3 per table:
- Date & time in GMT.
- Date & Time for the Time Zone and Hour you set in Ephemeris settings panel.
- Date & Time on your device is using when it is different from previous 2.
- Last Aspect – Displays the last planet to aspect the moon and the aspect it made.
Lunar Ingress
- Astrological Sign – Displays the next sign the moon entered after the last aspect it made in the columns to its left.
- Time Columns – 2 or 3 columns following the same rules as the Last Aspect table.
FYI: The moon is considered Void of Course during the period between last aspect it made to any body and the its ingress into the next sign.
Planetary Ingress
This table shows the date & time the listed bodies entered one of the astrological signs.
Moon Phases
This is a standard Lunar Phase table and lists the date & time in up to 3 Time Zones depending on your settings. It lists the exact positions of Moon & Sun at each phase.
Eclipse Tables
If eclipses occurred during the month, this relatively standard eclipse table displays: date, time, duration, magnitude, location of exactitude (lat/lng), gamma and Saros number for each eclipse.
Data Export
Data export allows any data in your version of the ephemeris including asteroids and uranians to be exported to a file of Comma Separated Values (.csv) and saved on your Mac. Data export requires an 'All Access subscription', see the iPhemeris store for details.

Planet Check Boxes
These are in the left sidebar. Click the Download button at the top of the sidebar panel to select and view the list of planets to export. These settings only apply to data export.
Start & End Date
These set the Start and End date of exported data. This setting, combined with the Frequency setting, determines how many rows of data are exported. You may select any period of time in the range of data supported by iPhemeris. For example if you set a start of Jan. 1, 2021 and an end of Jan. 1 2022 with a 1 day frequency you will get 365 rows of data.
Note: Long periods of time or very small time increments can take a long time to export. When exporting many rows of data it is better to do it in smaller date ranges and then merge the .csv files after.
Tropical / Sidereal
This setting determines if the values exported are tropical or sidereal. If sidereal, then the global Ayanamsa setting set in iPhemeris Settings is used. If you never set an Ayanamsa preference, then it defaults to Tropical and this setting has no effect.
Geocentric / Topocentric / Heliocentric
Data can be exported in any of the three types:
- Geocentric – Earth centered data.
- Topocentric – Earth centered data as viewed from the elevation at the spot on the Earth set in Location Preferences in iPhemeris Settings. When a location is set in Location Preferences the map panel obtains elevation.
- Heliocentric – Sun centered data. The Sun is not available, Earth can be used as an alternative.
Time Zone - Determines what time zone is used for the date setting. If UTC 00:00 is set, then the data is GMT for whatever time was set.
Frequency of Data Points
Use a combination of the Every field and the Period drop-down menu to determine how many rows of data are exported.
Examples:
- If you want to export hourly moon data, set Every = 1 and Hours in the drop down.
- If you want data twice a day or every 12 hours, set Every = 12 and Hours in the drop down.
- Weekly data can be obtained by setting Every = 7 and Days in the drop-down.
Be careful with this setting, setting hourly data for a period of 1 year is 24 rows x 365 days.
Data Fields
This determines how many columns of data you get for each planet selected. Most bodies have four values, if it does not then that column will simply be excluded for that body. Data fields that can be exported are:
- Zodiacle longitude
- Latitude
- Velocity. Negative values mean Retrograde, positive are direct.
- Declination
Some planetoids, like Chiron, do not have data available for all periods of time. Chiron for example, passed close to Saturn in the distant past, making it impossible to accurately calculate its location prior to that date. In those cases you will see the following value substituted: –99999.0
Lunar & Planetary Tables
Ephemeris pages have several tables related to the Moon and Planetary Ingress at the bottom of each page. Some of them require an All Access subscription. Most of them are similar to the various printed Ephemerides in the way the data is presented.
The Various Table Are (left to right):
- Last Aspect (Void of Course).
- Lunar Ingress.
- Planetary Ingress.
- Moon Phase
- Eclipse (if there were any).
- Solstice and Equinox time.
Void of Course Tables
Void of Course Lunar tables are located at the bottom of each monthly page in the lower left.
Last Aspect
- Time Columns – There can be up to 3 per table:
- Date & time in GMT.
- Date & Time for the Time Zone and Hour you set in Ephemeris settings panel.
- Date & Time on your device is using when it is different from previous 2.
- Last Aspect – Displays the last planet to aspect the moon and the aspect it made.
Lunar Ingress
- Astrological Sign – Displays the next sign the moon entered after the last aspect it made in the columns to its left.
- Time Columns – 2 or 3 columns following the same rules as the Last Aspect table.
FYI: The moon is considered Void of Course during the period between last aspect it made to any body and the its ingress into the next sign.
Planetary Ingress
This table shows the date & time the listed bodies entered one of the astrological signs.
Moon Phases
This is a standard Lunar Phase table and lists the date & time in up to 3 Time Zones depending on your settings. It lists the exact positions of Moon & Sun at each phase.
Eclipse Tables
If eclipses occurred during the month, this relatively standard eclipse table displays: date, time, duration, magnitude, location of exactitude (lat/lng), gamma and Saros number for each eclipse.
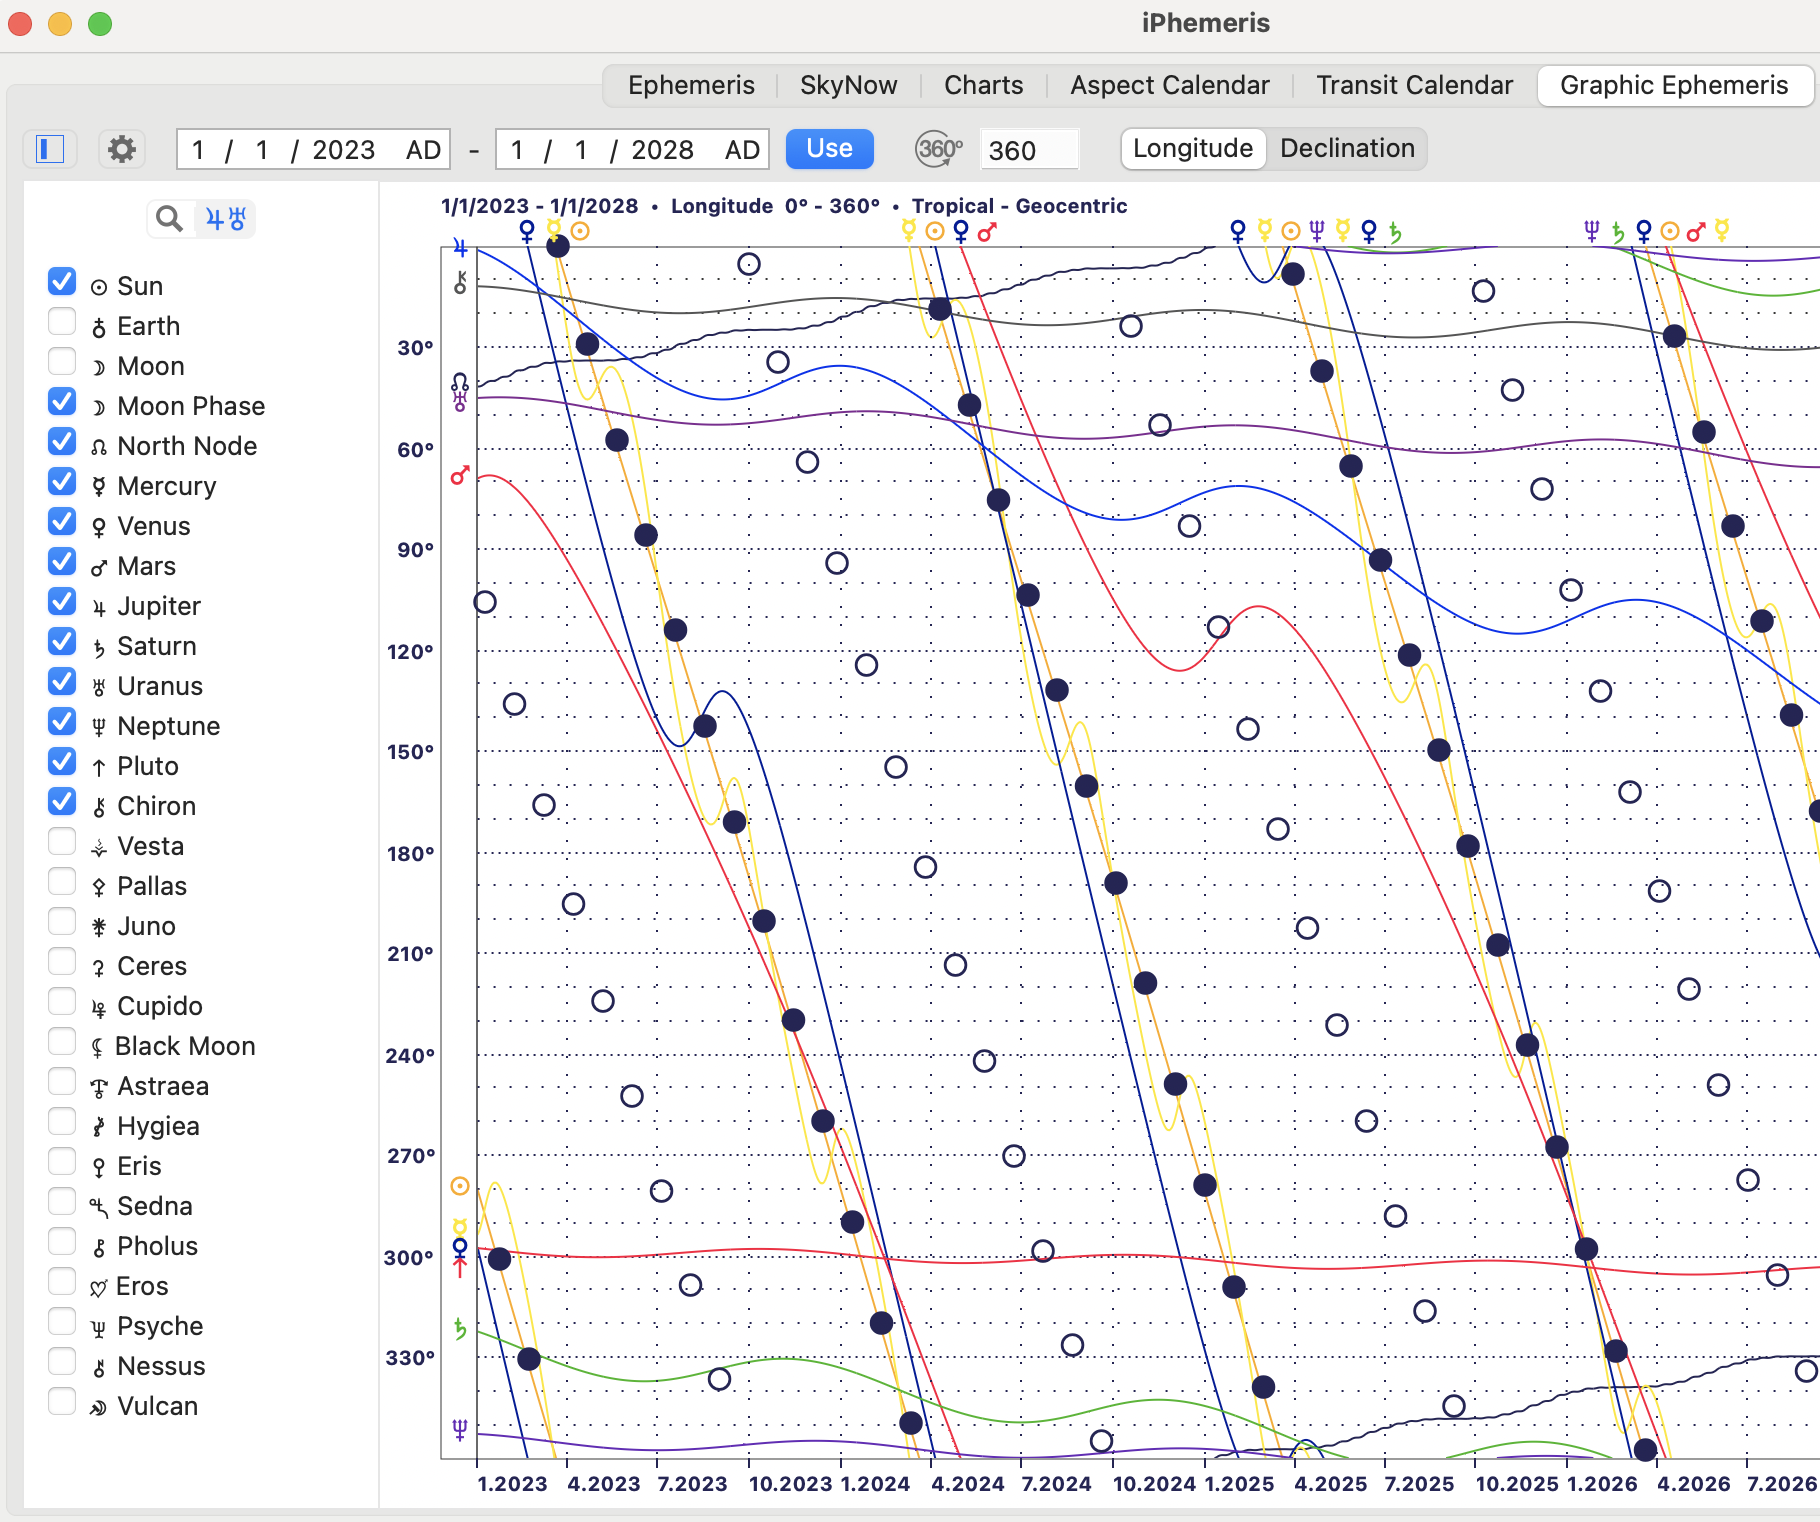
Graphic Ephemeris Toolbar
The main Graphic Ephemeris view on the features tab has a toolbar similar to all the iPhemeris feature tabs. The buttons left to right are:
Side Panel Disclosure Button
Shows or Hides the left side panel. This panel has two functions:
- Info Panel - When graphic data is displayed, if you click in the main view and then move the mouse, the info panel will displays the positions of all the bodies at that x-coordinate (vertical column) under the mouse.
- Planet Selector - Selects which planets and planetoids are displayed.
Side Panel Info Panel For Viewing Data
Use the Info Panel in the left sidebar to see the Astrological positions for any body currently displayed on the graph:
- Open the sidebar if it is not visible.
- Click the magnifying glass button on the panel.
- Click the mouse anywhere on the graph and astrological positions for the date wherever the mouse is moved are displayed.
Settings
Settings are accessed via the Gear where you select:
- Color Scheme.
- Ephemeris Type - Tropical or Sidereal. As for all the features Sidereal requires an Ayanamsa to be set in the global iPhemeris Settings.
- Data Type - Geocentric, Topocentric or Heliocentric.
Starting & Ending Date Range
You can display quite a long range of data, but the more you display the longer it can take to load. After setting both the start and end date, click the Use button and it will load the data.
Harmonic Range (360°)
The harmonic range selector can make it easier to find aspects by folding the graph over on itself for the selected date range. If you are not familiar with how this works, best to leave it set at 360°.
For example, if a range of 90 is set then the vertical scale is restricted to a range of 90° and things at 0°, 90°, 180° and 270° are all displayed at the 0° position and appear to be conjunct. This makes it easy to spot angles for the selected harmonic.
Harmonic ranges can only be used with Longitude data and are disabled when showing Declination.
Longitude
When longitude is selected, the zodiacal positions of the selected bodies are drawn for the date range set in the date selectors. This date will be of whatever type you set in Settings. Either Tropical or Sidereal. Geocentric, Topocentric or Heliocentric
Declination
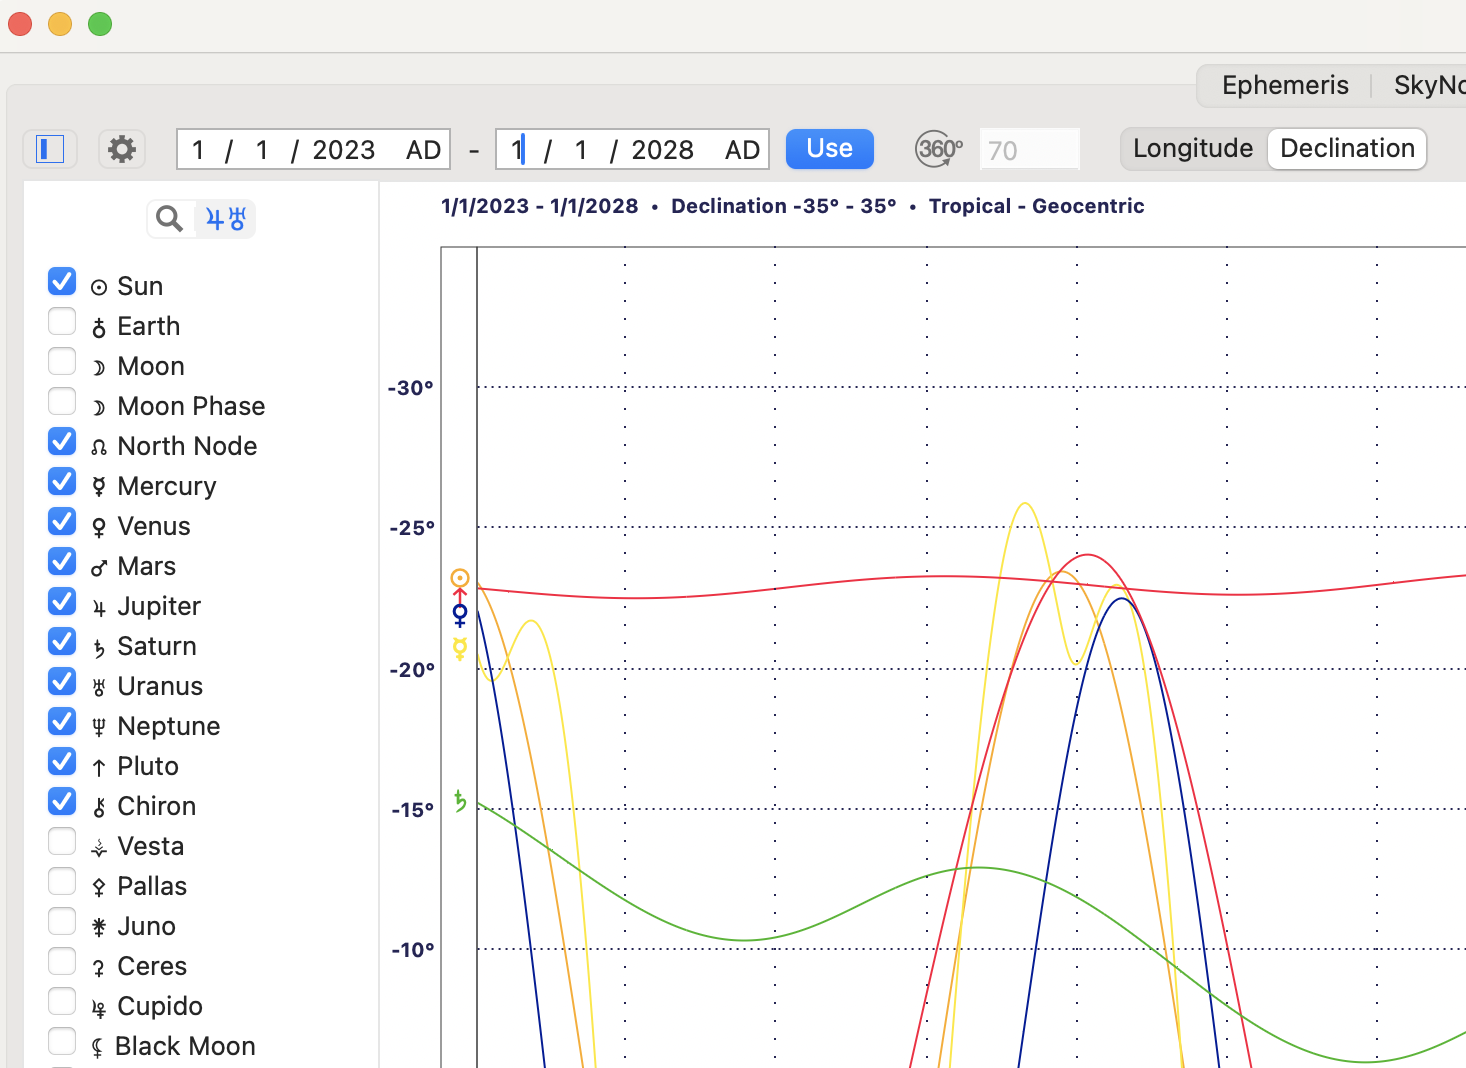
Declination shows the bodies positions above or below the equator. Declination for most bodies is between -30° (south) and 30° (north) degrees of latitude.
Harmonic ranges do not make sense for declination and the range selector is disabled when displaying declination data.
Graphic Ephemeris For Charts

When enabled, the Graphic Ephemeris tab in Charts and SkyNow Reports is also enabled. Its toolbar works mostly the same as described in the above section, but there are a few interface differences:
- Data for the Chart on the inner wheel is overlaid on the graph using horizontal lines.
- Which horizontal chart lines are shown on the graph is controlled by the same settings used to display points on the wheel of Chart & SkyNow.
- Which wavy longitudinal lines are displayed is controlled by the settings for displaying points on Chart & SkyNow Reports.
- Use the Search button to view data on the graph in a pop up Info Panel.
- Declination data is not available on the Graphic Ephemeris in Charts or SkyNow Reports.
Calendars
iPhemeris includes 2 calendars, an Aspect Calendar (Aspectarian) and a Transit Calendar. Both are quite useful and can be printed.
- The Aspectarian displays aspects between planets you select in a calendar format.
- The Transit Calendar shows aspects between things in the Sky & and a Radix chart you select, in calendar format.
Calendar Settings
Aspect and Transit Calendar share the same settings for:
- Tropical or Sidereal.
- Geocentric, Topocentric or Heliocentric.
Aspect Calendar

- Planets & Asteroids shown on the Aspectarian can be turned On or Off from the sidebar.
- Orbs for Aspects are adjusted in the left sidebar. Open it and click the button with the IF symbol. Fractional Orbs are allowed.
- Sidebar settings apply only to Aspect Calendar.
Transit Calendar

The first time you use it, it will prompt for a Radix Chart, select one from the list of existing Charts. If none exist yet, return later after you've created the one you want to use.
Transit Calendar Display
- The column of data in each day box to the left of the aspect glyph displays the position of things in the sky on that day.
- The column of data in each day box to the right of the aspect glyph displays the position of aspected bodies in the Radix Chart.
Selecting Transit Calendar Points
- Use the left sidebar to select displayed points:
- Left Button – Toggles on/off things in the Sky.
- Middle Button – Toggles things that can be aspected in the Radix Chart.
- Right Button – Sets Orbs.
- Use the Edit button in the toolbar to select a different Radix Chart.
- Sidebar settings apply only to Transit Calendar.
Printing
See the documentation on Preferences regarding global print settings.
Ephemeris & Calendar
Click the Printer button in upper right of the view, or Right-click or Ctrl-Click in the page.
Charts & Chart Reports
Right-click or Ctrl-Click on the Chart View or Report Tab you want to print.
iCloud
iPhemeris uses iCloud to backup and share your astrological charts between iPhemeris on all your devices. By default, iPhemeris enables itself to save your charts to your iCloud account. We do not recommend disabling this. iCloud is the only form of backup that iPhemeris uses, and requires minimal storage. If you turn it off, you could lose all your chart data if something happens to iPhemeris or your device.
iCloud Trouble Shooting
Handling Duplicate Charts
Duplicate charts sometimes happen, particularly if you turned iCloud OFF on some device or rarely during OS updating if iCloud gets temporarily turned off. The safest course to clean these up is to follow these steps:
- Make sure iPhemeris is allowed to use iCloud on ALL devices running iPhemeris.
- Make sure all devices have a good internet connection. If devices are using mobile connections only, then data over mobile must be enabled.
- Be sure that all devices are finished updating and have had time to re-sync. This can take several hours and it is best to wait 24 hours to make sure everything is done.
- If after 24 hours the duplicates remain, choose one and only one device and delete the duplicates. Deletions will automatically propagate to all your other devices.
Turning iCloud Storage Off
This is not recommended. Turning iCloud OFF means that you will have no backup for your astrology charts and if something happens to your system or iPhemeris on your device, you will not be able to recover chart data unless the system is fully backed up some other way.
iCloud Trouble Shooting
iPhemeris will never delete your chart data for any reason. Only you can delete charts. Therefore if you are not seeing charts on a new device or after an upgrade of iOS check all of the following:
- You are logged into iCloud.
- You are logged into the same iCloud account you used on the previous device.
- You have an internet connection.
- Any WIFI connection will work.
- If the connection is mobile only make sure that data over mobile is enabled and that iPhemeris is allowed to use it. The settings to enable iPhemeris to use mobile data are typically in the cellular section of iOS Settings App. Chart syncing requires mobile data when the connection is exclusively mobile (no WIFI).
- If the first 3 are OK and you still cannot save charts, check that you have not exceeded your iCloud storage limit.
Can't Save Charts
- Check that you have not reached your iCloud storage quota. If you are out of storage iPhemeris will fail silently. The simplest solution is to free up space by deleting something.
- iCloud sync and storage cache can sometimes become corrupt, but rare. This can be fixed by simply logging out of iCloud and back in again.
Symbols
Planets & Points
| Symbol | Name | |||
|---|---|---|---|---|
| J | Sun | Soleil | Sol | Sonne |
| N | Moon | Lune | Luna | Mond |
| K | Mercury | Mercure | Mercurio | Merkur |
| L | Venus | Venus | Venus | Venus |
| [ | Earth | Terre | Tierra | Erde |
| O | Mars | Mars | Marte | Mars |
| P | Jupiter | Jupiter | Jupiter | Jupiter |
| Q | Saturn | Saturne | Saturno | Saturn |
| R | Uranus | Uranus | Urano | Uranus |
| S | Neptune | Neptune | Neptuneo | Neptun |
| T | Pluto | Pluton | Pluton | Pluto |
| : | Pluto (esoteric) | Pluton | Pluton | Pluto |
| U | Chiron | Chiron | Chiron | Chiron |
| V | Vesta | Vesta | Vesta | Vesta |
| W | Pallas | Pallas | Pallas | Pallas |
| X | Juno | Juno | Juno | Juno |
| Y | Ceres | Ceres | Ceres | Ceres |
| Z | Cupido | Cupido | Cupido | Cupido |
| ^ | Astraea | Astraea | Astraea | Astraea |
| _ | Hygiea | Hygiea | Hygiea | Hygiea |
| ` | Eris | Eris | Eris | Eris |
| a | Eris (Alternate) | Eris (alt) | Eris (alt) | Eris (alt) |
| b | Sedna | Sedna | Sedna | Sedna |
| ~ | Pholus | Pholus | Pholus | Pholus |
| m | Eros | Eros | Eros | Eros |
| c | Vulcan | Vulcain | Vulcano | Vulkan |
| 4 | Vulcan (Alternate) | Vulcain | Vulcano | Vulkan |
| 9 | Black Moon (Lilith) | Lune Noire | Luna Negro | Schwarze Mond |
| l | White Moon (Selena) | Lune blanche | Luna Blanca | Weißer Mond |
| ] | N. Node | Noeud N. | Nodo N. | N. Mondknoten |
| \ | S. Node | Noeud S. | Nodo S. | S. Mondknoten |
| - | Ascendant | Ascendant | Ascendente | Aufwind |
| 3 | Descendant | Descendant | Descendiente | Absteigend |
| . | Mid Chart | Mid Chart | Mid Chart | Mid Chart |
| / | Imum Coeli | Fond du Ciel | Imum Coeli | Imum Coeli |
| 2 | Vertex | Vertex | Vertex | Vertex |
| 1 | Part of Fortune | Pt. Fortune | Pt. Fortune | Teil Glücks |
| 0 | Retrograde | Retrograde | Retrógrada | Umgekehrt |
Uranian (Hamburg) Hypothetical Bodies
These are now known not to exist, however some users have asked so we include them with an 'All Access' subscription.
| Symbol | Name | |||
|---|---|---|---|---|
| d | Cupido | Cupidon | Cupido | Cupido |
| e | Hades | Hadès | Infierno | Hades |
| f | Zeus | Zeus | Zeus | Zeus |
| g | Kronos | Kronos | Krono | Kronos |
| h | Apollon | Apollon | Apolo | Apollon |
| i | Admetos | Admète | Admeto | Admetos |
| j | Vulkanus | Vulcain | Vulcano | Vulcanus |
| k | Poseidon | Poséidon | Poseidón | Poseidon |
Aspects
| Symbol | Angle | Name | |||
|---|---|---|---|---|---|
| @ | 0° | Conjunction | Conjonction | Conjuncion | Konjunktion |
| A | 30° | Semisextile | Semisextile | Semisextil | Halbsextal |
| n | 36° | Decile | Decile | Decile | Decile |
| ? | 40° | Novile | Novile | Novil | Novile |
| B | 45° | Semi-square | Semi-carre | Semi-cuadratura | Halbquad- ratisch |
| p | 51.4° | Septile | Septile | Septile | Septile |
| C | 60° | Sextile | Sextile | Sextil | Sextaler |
| D | 72° | Quintile | Quintile | Quintil | Quitil |
| = | 80° | Bi-Novile | Bi-Novile | Bi-Novil | Bi-Novile |
| E | 90° | Square | Carre | Cuadratura | Quadratisch |
| o | 108° | TreDecile | TreDecile | TreDecile | TreDecile |
| F | 120° | Trine | Trigone | Trigono | Trigon |
| G | 135° | Sesqui-square | Sesqui-carre | Sesqui- cuadratura | Anderthal- bquadratisch |
| < | 144° | Bi-Quintile | Bi-Quintile | Bi-Quintile | Bi-Quintile |
| H | 150° | Quincunx | Quinconce | Quinconce | Quincunx |
| > | 160° | Quad-Novile | Quad-Novile | Cuad-Novil | Quad-Novile |
| q | 165° | QuinDecile | QuinDecile | QuinDecile | QuinDecile |
| I | 180° | Opposition | Opposition | Opposicion | Opposition |
| r | 0° | Parallel | Parallel | Parallel | Parallel |
| s | 180° | Contra-parallel | Contra-parallel | Contra-parallel | Contra-parallel |
Signs
| Symbol | Name | |||
|---|---|---|---|---|
| ! | Aries | Belier | Aries | Widder |
| " | Taurus | Taureau | Tauro | Stier |
| # | Gemini | Gemeaux | Geminis | Zwillinge |
| $ | Cancer | Cancer | Cancer | Krebs |
| % | Leo | Lion | Leo | Lowe |
| & | Virgo | Vierge | Virgo | Jungfrau |
| ' | Libra | Balance | Libra | Waage |
| ( | Scorpio | Scorpion | Escorpion | Skorpion |
| ) | Sagittarius | Sagittaire | Sagitario | Schutze |
| * | Capricorn | Capricorne | Capricornio | Steinbock |
| + | Aquarius | Verseau | Aquario | Wassermann |
| , | Pisces | Poissons | Piscis | Fische |
Vedic
Ayanamsa
| Ayanamsa | Degree Offset From Tropical Epoch 2000 |
|---|---|
| D.K. * | 28.37194647 |
| Fagan Bradley | 24.73666667 |
| Lahiri | 23.85305556 |
| Krishnamurti | 23.76194444 |
| Galactic | 25.00000000 |
| Raman | 22.40694444 |
| Takra I | 24.50027778 |
| Takra II | 24.54222222 |
| Babylonian | 24.78666667 |
| Deluce | 27.80555556 |
| Larry Ely | 28.00361111 |
| Yukteshwar | 22.47777981 |
| Sassanian | 19.99222425 |
| Ushashashi | 20.05639092 |
| Hipparchus | 20.24611314 |
| Dhira | 23.06666870 |
| Krushna | 22.95166870 |
* Courtesy of Keith Bailey who made available the date for the first decanate of the Age of Aquarius from some unpublished writings and instructions of the Master D.K. that were entrusted to his care.
Copyright & Trademark
iPhemeris® © 2008 - 2026 Clifford Ribaudo & iPhemeris LLC. All rights reserved.
iPhemeris® and the iPhemeris logo are Registered Trademarks of Clifford Ribaudo & iPhemeris LLC.