MacOS Sky Now
August 24, 2015iOS Charts – Quick Start
September 1, 2015Chart creating, editing and viewing is done from the Charts tab. The interface is simple and after familiarizing yourself with a few buttons you should be able to move around quickly.
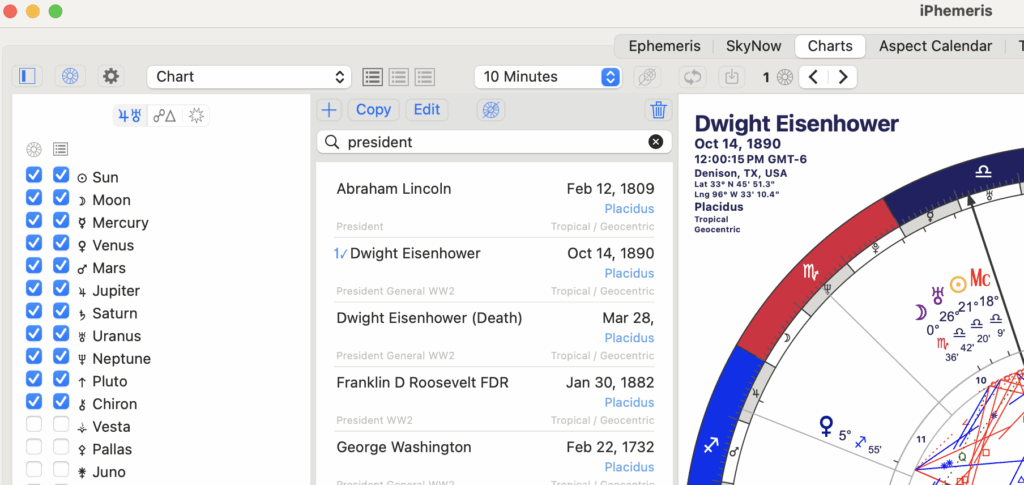
NAVIGATION (LEFT to RIGHT)
- Sidebar Disclosure Button – Show / Hide left sidebar.
- Displayed Planets & Points:
- The check boxes on the LEFT control what is displayed on the wheel and also the overlay (horizontal lines) of the Graphic Ephemeris in reports.
- The check boxes on the RIGHT control what is displayed on the reports and also the wavy ephemeris lines of Graphic Ephemeris in reports.
- Orbs & Displayed Aspects:
- Turn Aspect On/Off on chart and reports independently by checking or unchecking the box next to the Aspect label.
- Set orbs for Applying / Separating for Luminaries (Sun & Moon), Planets and other bodies, Fixed Stars.
- Fractional Orbs are allowed.
- Be sure orbs don’t overlap for aspects that are close (e.g. 45 and 51 degree aspects) else only the first will be show. In this case you would need to use an orb of less than 6 degrees.
- Fixed Stars:
- 800+ visible fixed stars are in the list.
- Search for them by common name or the constellation it is in.
- Use the check box to show them on the chart wheel and in reports.
- The list doubles as a fixed star Ephemerides. The position and sign shown is always the current position. Keep in mind that fixed stars move at approximately the same rate as precession, 1 degree of longitude every 72 years.
- Displayed Planets & Points:
- Chart List – To display a saved chart, click the button at the top of the sidebar with the Chart icon to show/hide the list. By default all charts are saved and backed up to iCloud (not wise to disable this). All charts saved to iCloud by any version of iPhemeris (iOS or Mac) will be available here.
- Add a Chart: Tap the ‘+’ button.
- Copy a Chart: Copy the selected chart. Only works when 1 chart is selected.
- Edit a Chart: Select a chart in the list:
- Make sure only one is selected (a blue check mark appears on the left of the currently selected chart(s)).
- Click the Edit button. If the button is not blue it means no chart is selected or more than one is selected.
- Make your edits in the dialog that appears.
- Clear Selected: Clears selected charts and stops displaying. Useful when selection is hidden by search filter or off screen.
- Delete a Chart: Select a chart in the list (only one), click the Trash button.
- Search/Filter: Search charts by Name or Categories. If you’ve added category tags to any of your charts, for example President, you can filter the list to only show charts “tagged” with the word President.
- Chart Style Settings – Click the gear button. See below for details.
- Show Charts Dropdown – Depending on the number of charts selected (1, 2 or 3) the drop down displays relevant display options. E.g. Currently selected chart with an additional chart for “Now” as a bi-wheel, or a composite of 2 selected charts, etc.
- Chart Notes: Add or edit written notes for the charts currently being displayed. Notes are saved as part of the chart data and sync via iCloud (when enabled) to all devices.
- Chart Rectification –
- Use the drop down to select a period to time step charts.
- Use the Arrow buttons to advance the respective chart forward or back the selected amount of time.
- Text Size (A/A) – Adjusts the size of text show in the aspect reports view.
- Print Button – Print the currently displayed charts and their respective reports.
- Adjust Size of Chart Relative to Aspect Grid: Drag the divider between the wheel and the Aspect grid.
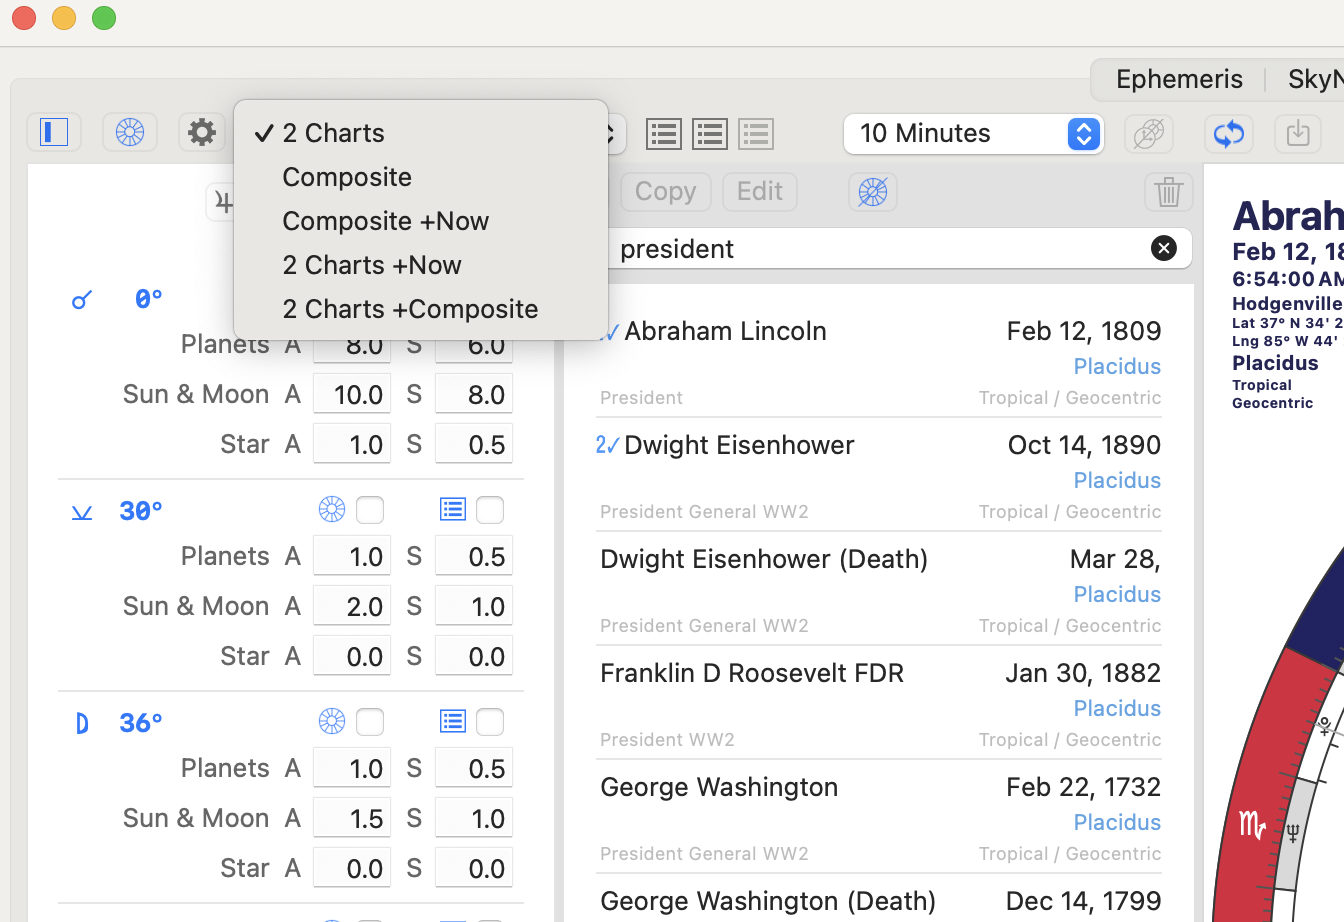
DRAW 1 CHART
- Click the row of the chart to draw.
- Select a Chart Type from the dropdown in the Toolbar.
DRAW 2 CHARTS (Bi-Wheel)
- Click any two charts in the list (first is on inner wheel, second on the outer).
- Make sure only two charts are selected, or de-select unwanted charts.
- Select 2 Charts in the drop-down in the toolbar.
DRAW 3 CHARTS (Tri-Wheel)
- Select any 3 charts in your list.
- Select 3 Charts in the drop-down above the chart display.
DRAW COMPOSITE
- Select two Charts.
- Select “Composite” in the dropdown in the toolbar.
DRAW BI-WHEEL with NATAL, RELOCATED, PROGRESSED or SOLAR RETURN
- If you’ve not already done so, make a Copy of the natal chart. To make a copy, select the chart (only 1 chart may be selected) and use the copy button.
- Edit one of the copies and add the additional data in the relevant section for whichever type you are trying to create: Relocated, etc. We recommend making a copy for each additional type. Then these can be compared in Bi or Tri-Wheels to the Natal horoscope.
- Select the Natal horoscope.
- Select the Relocated, Progressed or Solar Return.
Adding & Editing Charts
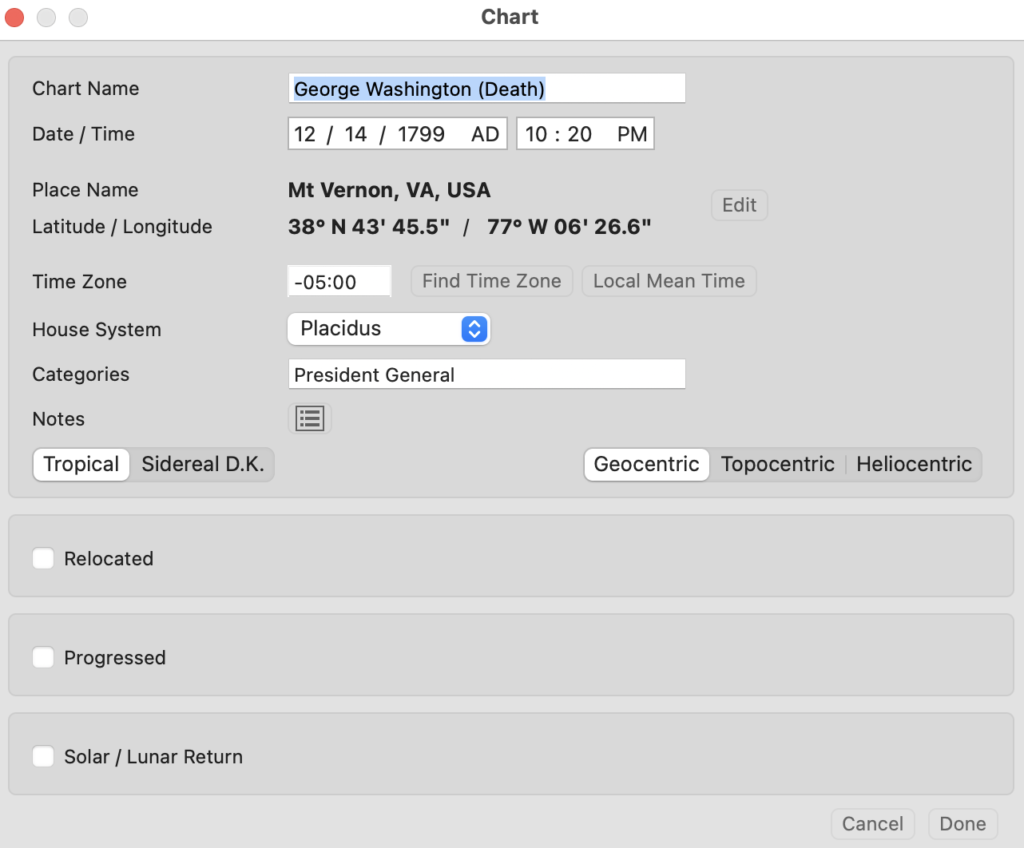
Time Zone lookup works best when data is entered in the dialog in the order the fields are listed (start at the top and work down).
- Date and Time – This is required.
- Location – To enter Latitude and Longitude, click the Edit button next to those fields. The Map view will drop down. The Map allows manual entry of latitude and longitude, search for locations by name, and drag and zoom to find locations. The position under the cross-hair is used and is more precise depending on the degree to which the map is zoomed.
- Time Zone
- After date, time and place have been entered, use the Find Time Zone button to look it up.
- Alternatively, you can enter it manually. iPhemeris uses standard time-zone notation, e.g. time zones west of GMT are negative (-) and east (+).
- Local Mean Time – Calculates a time zone from the chart longitude. This is for researchers and should only be used by those who understand how and when to use it.
- Note – The Map and Time Zone lookup require Internet access.
- House System: Select a house system to use for the chart. This setting overrides whatever you set as the default for this chart only.
- Categories: Add any words to categorize your charts. These can be used in the chart list to search, filter and group your charts.
- Notes: Add and edit notes about the chart.
- Tropical / Sidereal – Individual charts can now display either tropical or sidereal positions (tropical sidereal is no longer a global setting). Sidereal positions use the global setting for Ayanamsa set in iPhemeris Preferences.
- Geocentric / Topocentric / Heliocentric – Horoscopes can display positions for any of these types of data. Topocentric positions use elevation (altitude above sea level) obtained from NASAs global elevation database. The value is obtained when you use the map to set the location. If you have an existing chart and are switching it to display Topocentric data, use the Map (Location EDIT button) to get the location again so that the elevation can be obtained.
Relocated, Progressed & Solar Return Horoscopes
The fastest (and recommended) way to create Relocated, Progressed and Solar or Lunar return charts is to make a copy of the respective natal chart. Select one in your chart list and use the copy button, then find the copy and edit to add Relocated, Progressed or Solar Return settings. Copies makes it possible to compare them in bi-wheels or tri-wheels to each other.
Relocated Chart
Relocation Charts require additional information. After You’ve entered Natal or Event information, check the Relocated box to enter Relocation data.

- Location (required) – Provide latitude and longitude using the Map view. Use the Edit button to display the Map view.
- Place Name (optional) – Location search from the Map sets this automatically, you can manually enter and edit it.
Progressed Charts
Progressed Charts require additional information. After you’ve entered Natal or Event information, check the Progressed box to add Progression data.
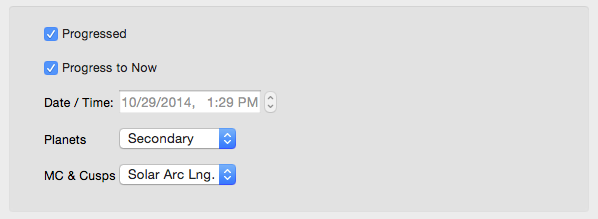
- Select Progress to Now if you wish the chart to always be progressed to the current date and time.
- Or de-select Progress to Now, to set a specific Date and Time.
- Either Progress to Now or a Date and Time are required.
- Choose a Planet and Cusp progression styles.
- Charts can be both Relocated and Progressed.
Solar & Lunar Return Charts
Solar and Lunar Return horoscopes require additional information. After You’ve entered Natal or Event information, check the Solar / Lunar Return box.
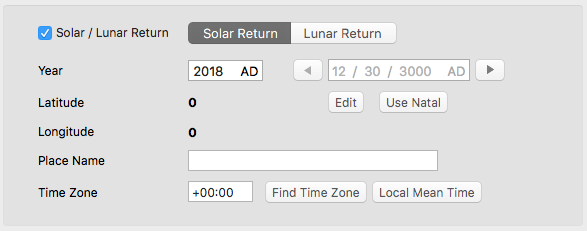
Solar Return
- Year – Enter a year for the solar return. Must be 4 digits. Click AD/BC to toggle (on available with extended ephemeris option).
- Location (required) – Set the place where the subject was on the Date & Time of the Solar Return.
- Edit – displays the map and allows location search.
- Use Natal – When the subject was at the same location as for the natal chart, this sets the Solar Return location with that data.
- Place Name (optional) – set by the Map tool and can be edited. This is not location lookup. Use the map map for location lookup.
- Time Zone:
- After date, time and place have been entered, use the Find Time Zone button to look it up.
- Or, enter time zone manually. iPhemeris uses standard time zone notation.
- Local Mean Time – Calculates a time zone from the chart longitude. This is for researchers and should only be used by those who understand how and when to use it.
- Solar Return charts cannot also be Relocated or Progressed.
Lunar Return
The data required to cast Lunar Return charts is essentially the same as for Solar Returns. To create one:
- Select the Lunar Return button on the Solar / Lunar Return panel.
- Enter a date near the date you want a Lunar Return chart for.
- Use the Previous and Next buttons to find Lunar Returns after, or previous to that date.
- Continued clicking of next/previous buttons steps back and forward through all lunar returns for the charts natal moon location.
NOTE: If the chart type does not remain selected after leaving the Edit Chart dialog, it is because iPhemeris did not find all the data needed to display that type of chart. Please check that you have entered all required information.